Exercise 3: Respond to drawer-menu selection to update your UI (XAM301)
This exercise walks you through building a new Xamarin.Forms application using the Model-View-ViewModel application style.

To complete the exercise, you will need Visual Studio for Windows or macOS with the Xamarin development tools installed. You will also need either an emulator/simulator or a device to run the exercise on. Please see the setup page if you need help installing the Xamarin development environment.
Create a new Xamarin.Forms project
You're going to add a final version of your QuickFlicks app into the mix in the form of a Xamarin.Forms application. As before, you can either add the set of projects to your existing solution, or you can create a new solution.
Note If you decide to stick with a single solution, it's useful to separate out the projects by creating a Solution Folder (the completed lab uses the name "XForms") and creating the Xamarin.Forms projects in that folder - this will avoid name collisions with the native UI apps you've already created.
Create a new project using Visual Studio for Mac:
- Launch Visual Studio for Mac.
- Select File > New Solution or right-click on the Solution node and select Add > Add New Project.
- Locate the Multiplatform > App category.
- Choose the Blank Forms App template.
Create a new project using Visual Studio for Windows:
- Launch Visual Studio for Windows.
- Select File > New > Project.
- Locate the Visual C# > Cross-Platform category.
- Choose the Cross-Platform App (Xamarin) template.
Choose your project name and location
- Name the app QuickFlicks - the templates will generate multiple projects with different suffixes.
- The completed lab will use the Shared Library option, but you can use either PCL or Shared Library.
- Make sure the "Use XAML for the user interface files" is checked and Click Next.
- Choose a location for the project.
- Use the default values for all other project settings.
- Click Create.
- Name the app QuickFlicks - the templates will generate multiple projects with different suffixes.
- Choose a location for the project.
- Change the Solution option to "Add to Solution" if you want to add the project to your existing solution.
- Click OK to move to the options screen.
- Select "Blank App" from the template choices.
- Make sure "Xamarin.Forms" is selected.
- The completed lab will use the Shared Library option, but you can use either PCL or Shared Library.
- Click OK.
If you are on Windows 10, you will get a prompt about the Windows 10 API version you want to target. Generally, you should just take the default options presented unless you have a specific requirement to meet.
Explore the Xamarin.Forms projects
The Xamarin.Forms template always creates multiple projects - one for each native UI platform you'll be targeting, and one for the shared UI representation will describe using Xamarin.Forms. As mentioned, depending on your environment, you might not have all the projects listed here.
If you are not familiar with Xamarin.Forms, you've got quite a few courses to help you pick it up. Start with XAM120 - Intro to Xamarin.Forms.
| Project | Description |
|---|---|
| QuickFlicks | This the shared UI which is described in XAML. All the native platform-specific projects must have a reference to this project. |
| QuickFlicks.iOS | The native iOS app bundle that runs your app in iOS. This generates a real iOS native binary, with native UI created from the shared UI defined in the XAML project. |
| QuickFlicks.Droid | The native Android app package that runs your app in iOS. This generates a native binary for Android, with native UI created from the shared UI defined in the XAML project. |
| QuickFlicks.UWP | The native UWP app package that runs your app on the various UWP platforms. This generates a real Windows binary, with native UI created from the shared UI defined in the XAML project. |
Update the NuGet packages (OPTIONAL)
Unlike your native UI projects, the Xamarin.Forms projects have quite a few external NuGet dependencies. When starting a new project, it's a good idea to update those packages to the latest stable releases. This is optional, feel free to skip this if you are low on time for the lab exercise.
- Right-click on the Solution node (root) in the Solution Explorer and select "Update NuGet packages" to update all of the requirements at once.
- Alternatively, you can update the NuGet references on a per-project basis, just make sure you keep them all synchronized and on the same versions, particularly the Xamarin.Forms package!
- Right-click on the Solution node (root) in the Solution Explorer and select "Manage NuGet Packages for Solution..."
- In the NuGet dialog, select the Updates tab.
- Start with Xamarin.Forms, if there's an update available, apply that one (and only that one) first to all projects in your solution. You can do this by checking the box next to the Xamarin.Forms package, Then checking all packages on the right hand side and clicking Install, or Update (both buttons will do the same thing in this case).
- This will often update many of the other packages, which is why you start here. Once it's finished, update the Xamarin.Android.Support.v4 package if there's an update available. This will also upgrade most of the Android support packages since they are dependencies.
- Update any remaining Android packages.
- Finally, you might have an update available for the UWP package - however this one has a dependency on Visual Studio and the build of Windows 10 you are running on. Stay on 5.2.x if you are using Visual Studio 2015, or if you are on an older version of Windows 10.
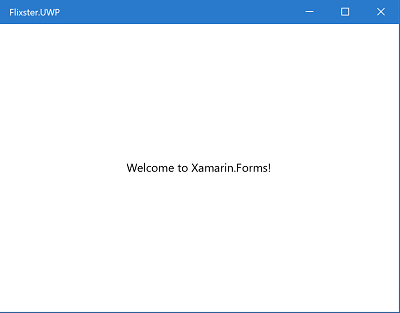
Run the application
Depending on your development environment (macOS vs. Windows), you will have different platform options you can test on. Select the one you can run the easiest and work with that for this lab project. Your goal isn't really to exploit the cross-platform nature of Xamarin.Forms UI here, just to show off the MVVM pattern.
- Select one of the platform-specific projects (iOS, Android, UWP, etc.) and make it the active project.
- Build the app to make sure that it compiles.
- Run the app on Xamarin Live Player, an emulator/simulator, or a physical device.
- It should display a "Welcome to Xamarin.Forms" message.
Add the QuickFlicks.Data Library
-
Add a reference to the QuickFlicks.Data project to each of the projects.
- if you started a new solution, you'll need to add the project to your solution from the Assets folder include with the lab materials.
- Add a NuGet package reference to Newtonsoft.Json to each of the platform-specific projects in your Xamarin.Forms solution.
Create the UI in XAML
- Locate the QuickFlicks project where the shared UI is defined.
- Open the QuickFlicksPage.xaml file.
- Open the MainPage.xaml file.
- Replace the content with the following View definition. This will create the same basic UI you used in iOS and Android, a search bar and a TableView/ListView:
<ContentPage.Content>
    <StackLayout>
        <SearchBar Placeholder="Title or Keyword" />
        <ListView />
    </StackLayout>
</ContentPage.Content>
- Add a
Titleproperty to theContentPagedefinition - set it to "QuickFlicks"
<?xml version="1.0" encoding="utf-8" ?>
<ContentPage xmlns="http://xamarin.com/schemas/2014/forms" ...
             Title="QuickFlicks"
             x:Class="QuickFlicks.MainPage">
Add a Navigation Page
While the app will be fine as you have it, you can get a nice header across the top very easily in Xamarin.Forms by adding a NavigationPage to the structure.
- Open the App.xaml.cs code behind file in your shared UI project.
- In the constructor, notice that it sets the
MainPageproperty to an instance of theXAMLdefined UI you just worked with. - Wrap that instance in a new
NavigationPageobject and assign that toMainPageinstead as shown below:
public App ()
{
    InitializeComponent();
    MainPage = new NavigationPage(new QuickFlicks.MainPage());
}
Create the ViewModel project
You could place the ViewModel(s) into the shared project already created by Xamarin.Forms, but it's also helpful to separate it out to a different project to keep it separate (and potentially reuseable) from the Xamarin.Forms platform files.
- Create a new Class Library (PCL, Shared Project, or .NET Standard Library); prefer to use a .NET Standard Library.
- Name it QuickFlicks.ViewModels.
The completed lab uses .NET Standard 1.4 libraries which are supported on all platforms - even older versions of UWP. Make sure to select the .NET Standard Library template:
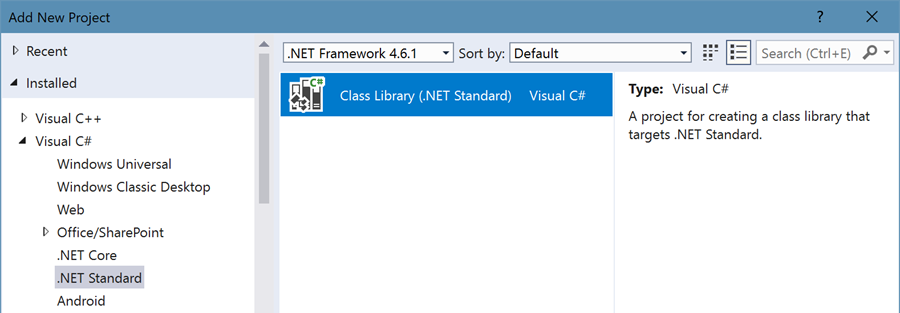
The template included in Visual Studio 2017 targets the latest .NET Standard by default; however not all versions of UWP can use that - specifically you must be on the Fall Creator's Update (FCU) to full support for .NET Standard 2.0. You can change the target version by opening the properties of the .NET Standard Library after you create it and select a different version from the dropdown.
Add the Main View Model
You need a primary (main) ViewModel to work with. This will hold your data that you want to expose to the view. ViewModels almost always implement the Observer pattern with INotifyPropertyChanged. We cover this completely in XAM270 - Data Binding in Xamarin.Forms.
- Create a new C# class in your ViewModels project, name it MainViewModel.cs.
- Make the class
publicand have it implementINotifyPropertyChanged -
Add a private helper method to raise the
PropertyChangedevent for a given property name string.- Name the method
RaisePropertyChanged - It should take a
stringwhich is the property name. - You can use the
[CallerMemberName]compiler support we cover in XAM270 to supply the property name if you like. See the code snippet below to see what that is.
- Name the method
public class MainViewModel : INotifyPropertyChanged
{
    public event PropertyChangedEventHandler PropertyChanged;

    private void RaisePropertyChanged([CallerMemberName] string propertyName = "")
    {
        PropertyChanged?.Invoke(this, new PropertyChangedEventArgs(propertyName));
    }
}
Add a Movie List property
ViewModels always expose their data as public properties. This is all that the data binding engine supports. You should design your data access with this in mind.
The first piece of data you need is the list of movies to work with. you can use the same basic logic you put into the Controller in iOS and the Presenter in Android.
- Create a new public property named Movies of type
IReadOnlyList<Movie>. It should have a getter and a private setter and a backing storage field in the class. - When the setter is called, use your
RaisePropertyChangedmethod to let any associated data binding know that the property has been changed.
public class MainViewModel : INotifyPropertyChanged
{
    private IReadOnlyList<Movie> _movies;

    public IReadOnlyList<Movie> Movies
    {
        get => _movies;
        private set
        {
            _movies = value;
            RaisePropertyChanged(nameof(Movies));
        }
    }
}
Add search support to the ViewModel
Just like the other two apps you've worked on, you need a method to pull your list of movies from iTunes.
-
Add a new method to the class named
OnSearchTermChangedAsyncand pass it astringsearchTerm.- It should return a
Task.
- It should return a
-
Use the logic from the Presenter code in Android to implement the method. You want to essentially do the same thing. The difference is that here you'll just assign the results to your Movies property.
- Remember to add the
CancellationTokensupport!
- Remember to add the
private CancellationTokenSource cts;
private async Task OnSearchTermChangedAsync(string searchTerm)
{
    cts?.Cancel();

    if (!string.IsNullOrEmpty(searchTerm))
    {
        var innerToken = cts = new CancellationTokenSource();

        var movieService = new MovieService();
        var movies = await movieService.GetMoviesForSearchAsync(searchTerm);
        if (!innerToken.IsCancellationRequested)
        {
            Movies = movies;
        }
    }
    else
    {
        Movies = null;
    }
}
Given that this is the 3rd time you've written a variation of this method, can you think of a principle you should be using here?
Add the UI for displaying a movie
Now that you have a Movie collection, let's add in the View code to display it. To do that, you need to data bind the ListView to your ViewModel data. You cover the ListView and the specific things you are doing here in an earlier class XAM280 - Using ListViews in Xamarin.Forms.
- Open the XAML file where you defined the
ListView. - Data bind the
ItemsSourceproperty to theMoviesproperty. -
Set the
ItemTemplateto be a simpleTextCell- Data bind the
Textto the movieTitle. - Data bind the
Detailto the movieDescription.
- Data bind the
<ListView ItemsSource="{Binding Movies}">
    <ListView.ItemTemplate>
        <DataTemplate>
            <TextCell Text="{Binding Title}" Detail="{Binding Description}" />
        </DataTemplate>
    </ListView.ItemTemplate>
</ListView>
Set the binding context
You are almost able to run the app and see some results. You need to do one major thing first though, associate the View Model with the View you just setup. This is covered in the XAM270 Data Binding class, but it's very simple:
- First, add a reference to your QuickFlicks.ViewModels library to each of your other Xamarin.Forms projects.
- Open the xaml.cs code behind file for your UI.
- Set the
BindingContextproperty to a new instance of yourMainViewModel. You'll likely need ausingstatement to bring the class into scope. You can set this either before or after the call toInitializeComponent.
using QuickFlicks.ViewModels;

public partial class MainPage : ContentPage
{
    public MainPage()
    {
        BindingContext = new MainViewModel();
        InitializeComponent();
    }
}
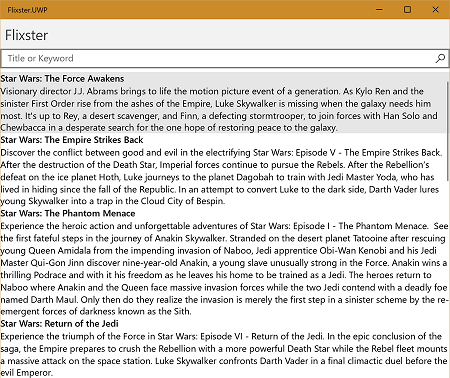
Test the Movies list
Now, you need to test the retrieval of movies and display in your list.
- Go back to your ViewModel implementation.
- Add a public, default constructor to the class.
- Add a call to
OnSearchTermChangedAsyncin the constructor with your favorite search term. - Run the app - it should display your movies!
Add a Search property to the ViewModel
Just like the other two apps you've worked on, you have a SearchBar in your View. You'll want to track what the user types there and respond by changing the movie list. Add a string to capture the search text.
- Add a new public property named
SearchTextwith a backing field (e.g. do not use an auto property). - When the setter is called, use your
RaisePropertyChangedmethod to notify the binding system that the property value has changed. This will then push the value into UI. - It's always a good idea to only do the property setter logic if the property value has actually changed - test that with an
ifcondition and only do your code if the value is different than the stored field.
public class MainViewModel : INotifyPropertyChanged
{
    private string searchTerm;

    public string SearchTerm
    {
        get => searchTerm;
        set
        {
            if (searchTerm != value)
            {
                searchTerm = value;
                RaisePropertyChanged();
            }
        }
    }
}
Connect the search logic to the Search property
Now that you've got the SearchText property, and your OnSearchTermChangedAsync method, you need to connect the two.
- In the property setter for
SearchText, callOnSearchTermChangedAsyncwith the new value.
This will show some green squiggles under the call because it's async and you aren'tawaiting it. However, this is a property which cannot useasyncandawait!
- To fix the compiler warning about the call not be awaited on, let's resort to an older way to get the result from a
Task- a continuation. We cover this technique extensively in our CSC351 - Writing Multithreaded Mobile Applications class. But you can use the following code which will make sure that any exceptions are noticed on the main thread. It also will remove the compiler warning.
OnSearchTermChangedAsync(searchTerm)
    .ContinueWith(tr => throw new Exception("Search Failed.", tr.Exception),
    TaskContinuationOptions.OnlyOnFaulted);
Bind the SearchTerm property to the UI
The last step to make this a fully functional program is to data bind the SearchTerm property in your View Model to the View.
- Open the XAML view definition and find the
SearchBar. -
Apply a data binding to the
Textproperty to associate it to theSearchTermproperty with a two-way binding.- remember your
BindingContextis the View Model.
- remember your
<SearchBar Placeholder="Title or Keyword" Text="{Binding SearchTerm, Mode=TwoWay}" />
- You can remove the test call in the
MainViewModelconstructor to make the initialListViewempty again. - Run the app to try out the search capability.
Optimizing your bindings (OPTIONAL)
The last thing you can do if you have time is to optimizing the binding engine by turning on compiled bindings. There are two things you have to do to make this work:
- Turn on the XAML compiler (XAMLC).
- Tell the
DataTemplatedefinition what data type it's working with.
Here's the steps for this project.
- Open the .xaml.cs code-behind file for your View.
- Add the following assembly-level directive to the file before the
namespacedeclaration. This turns on the XAML compiler for all XAML pages defined in this project/assembly.
[assembly: XamlCompilation(XamlCompilationOptions.Compile)]

namespace QuickFlicks
{
    public partial class MainPage : ContentPage
- Next, switch to the XAML page.
- At the top of the file, with the other
xmlnsdefinitions, add one for your Model objects:
<?xml version="1.0" encoding="utf-8" ?>
<ContentPage xmlns="http://xamarin.com/schemas/2014/forms"
             xmlns:x="http://schemas.microsoft.com/winfx/2009/xaml"
             xmlns:local="clr-namespace:QuickFlicks"
             xmlns:model="clr-namespace:QuickFlicks.Data;assembly=QuickFlicks.Data"
             Title="QuickFlicks"
- Next, find the
DataTemplatedefinition you created for theListView. Add ax:DataTypeproperty to it and set the value to "model:Movie".
<ListView.ItemTemplate>
    <DataTemplate x:DataType="model:Movie" >
        <TextCell Text="{Binding Title}" Detail="{Binding Description}" />
    </DataTemplate>
</ListView.ItemTemplate>
Exercise summary
In this exercise, you created a new Xamarin.Forms application using the Model-View-ViewModel architectural style.
- The Model was contained in the a separate assembly/layer.
- The View was created in a .XAML file.
- The ViewModel was a separate class (in a separate assembly) that was connected to the View through Xamarin.Forms Data Binding.
You can view the completed solution in the Exercise 3 > Completed folder of your copy of the cloned or downloaded course materials.