Exercise 2: Apply MVP in an Android application (XAM301)
This exercise walks you through building a new Android application using the Model-View-Presenter application style.

To complete the exercise, you will need Visual Studio for Windows or macOS with the Xamarin development tools installed. You will also need either an emulator/simulator or a device to run the exercise on. Please see the setup page if you need help installing the Xamarin development environment.
Create a new Xamarin.Android project
You're going to add an Android version of our QuickFlicks app. You can either add the project to your existing solution with the iOS version, or you can create a new solution.
Create a new project using Visual Studio for Mac:
- Launch Visual Studio for Mac.
- Select File > New Solution or right-click on the Solution node and select Add > Add New Project.
- Locate the Android > App category.
- Choose the Blank Android App template.
Create a new project using Visual Studio for Windows:
- Launch Visual Studio for Windows.
- Select File > New > Project.
- Locate the Visual C# > Android category.
- Choose the Blank App (Android) template.
Choose your project name and location
- Name the app QuickFlicks.Droid.
- Adjust any options you like and click Next.
- Choose a location for the project.
- Use the default values for all other project settings.
- Click Create.
- Name the app QuickFlicks.Droid.
- Choose a location for the project.
- Change the Solution option to "Add to Solution" if you want to add the project to your existing solution.
- Use the default values for all other project settings.
- Click OK.
Run the application
- Build the app to make sure that it compiles.
- Run the app on Xamarin Live Player, an emulator, or a physical device.
- It should display an empty screen on your device.
Add the QuickFlicks.Data Library
-
Add a reference to the QuickFlicks.Data project to your new Android app.
- if you started a new solution, you will need to add the project to your solution from the Assets folder include with the lab materials.
- Add a NuGet package reference to Newtonsoft.Json to your Android project.
- Add a NuGet package reference to Newtonsoft.Json to your Android project.
Create the UI with the Android Designer
- Expand the Resources folder in the solution and locate the layout folder.
-
Open the Main.axml file in the layout folder. This is the View for our main
Activity.- Once the designer loads, you'll see a blank screen, it's really a
LinearLayoutwhich is exactly what you want.
- Once the designer loads, you'll see a blank screen, it's really a
- Locate the
SearchViewcomponent in the ToolBox. You can use the Search box at the top to quickly find it. - Drag a
SearchViewfrom the ToolBox onto the design surface. It should be positioned at the top of the designer view. - Click on the search view to select it, and in the Properties pane, locate the id property and change the value to "@+id/searchView".
- Locate the
ListViewcomponent in the ToolBox and drag one below your search view. - Select the ListView in your design and change the id to "@+id/movieList".
Create the Presenter
The MVP style can be implemented in a few ways with the code-behind style used in Android (or similar GUI frameworks). You could make the code-behind file the presenter and put your logic there, or you can create a dedicated presenter class and use it from the Activity code. You'll take this latter approach since it tends to be more testable and conforms more closely to your goal of separating out domain logic from the view.
- Create a new C# class in the project and name it
MoviePresenter. -
Add a new public method named
FilterMoviesAsyncto the presenter class.- Have it take a
stringfor the searchTerm. - Have it return
Task.
- Have it take a
You'll load movies from your MovieService, but you need to push that data to the View. There are a variety of solutions. You could use an Observer pattern (e.g. ObservableCollection<T>), but you'll use a different approach.
- Add a public
eventof typeAction<IReadOnlyList<Movie>>namedFilterAppliedto the class. You'll have clients subscribe to this event to be notified when your movies have been filtered and have a new list to pull from.
public class MoviePresenter
{
   public event Action<IReadOnlyList<Movie>> FilterApplied;
   ...
}
-
Now you can implement your
FilterMoviesAsync. If the passed searchTerm is not empty, make a call to theMovieServicelike you did in iOS, and pass the results to the new event you just created.- You will need to
awaitthe returning Task to get to the data.
- You will need to
-
If the searchTerm is empty, invoke the event with
nullto indicate to value. Remember that .NET events arenullin C# if there are no subscribers - use the conditional null operator, or explicitly test the event before you call it.
public async Task FilterMoviesAsync(string search)
{
    if (!string.IsNullOrEmpty(search))
    {
        var movieService = new MovieService();
        var movies = await movieService.GetMoviesForSearchAsync(search);
        FilterApplied?.Invoke(movies);
    }
    else
    {
        FilterApplied?.Invoke(null);
    }
}
Add the ListView Adapter
Just like iOS, the Android ListView uses a separated data pattern to supply data to display. In fact, the pattern used is almost identical. You have complete coverage of this topic in our AND110 - ListViews and Adapters class at Xamarin University.
Since this part isn't relevant to your usage of MVP, there is a predefined MovieAdapter contained in the Assets folder for this lab part.
- Add the MovieAdapter.cs file to the Android project. You can find the source file in the Exercise 2/Assets folder, or online in GitHub.
-
Open the file to examine the contents. It implements the built-in Xamarin.Android class
BaseAdapter<T>and has an additional method namedSetDatato assign theMoviecollection. It also uses the View Holder pattern to optimize access to the view generated.
Connect the Adapter to the ListView
- Open the MainActivity.cs file and locate the
OnCreateoverride. -
After the call to
SetContentView, use theFindViewByIdmethod to locate yourListViewand assign it to a local namedmovieList.- the resource ID should be
Resource.Id.movieListif you gave it the proper id.
- the resource ID should be
- Create a new
MovieAdapterobject and assign it to a local namedadapter. - Assign the
adapterto theAdapterproperty on theListView.
var movieList = FindViewById<ListView>(Resource.Id.movieList);
var adapter = new MovieAdapter();
movieList.Adapter = adapter;
Use the Presenter to fetch movies
- After the
MovieAdapterhas been assigned to theListView, create a newMoviePresenterobject and assign it to a new private field in yourActivityclass. Name the fieldpresenter. - Wire up the
FilterAppliedevent to theMovieAdapter.SetDatamethod on your adapter local object. -
Finally, to test it, make a call to the presenter's
FilterMoviesAsyncmethod - pass it your favorite search term.- You should
awaitthe method to make sure any exceptions are moved back to the main thread.
- You should
protected async override void OnCreate(Bundle savedInstanceState)
{
    ...
    movieList.Adapter = adapter;

    presenter = new MoviePresenter();
    presenter.FilterApplied += adapter.SetData;
    await presenter.FilterMoviesAsync("Star Wars");
}
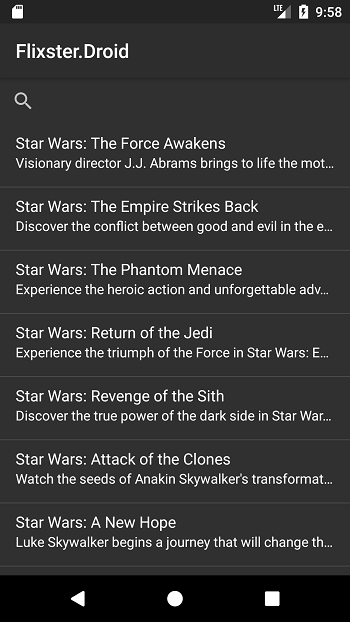
- Run the app -- it should display your movies!
Add support for searching
Now, respond to the SearchView and adjust your movies. Again you are going to pass the functionality off to your presenter class, but the actual UI action will be handled in your code behind Activity file.
- Locate the
SearchViewyou added into the layout - the id should beResource.Id.searchView. - Wire up to the
QueryTextChangeevent on the SearchView to a method in theActivity. - In the event handler, call the Presenter's
FilterMoviesAsyncto change the movie filter. - You can comment out the test call to
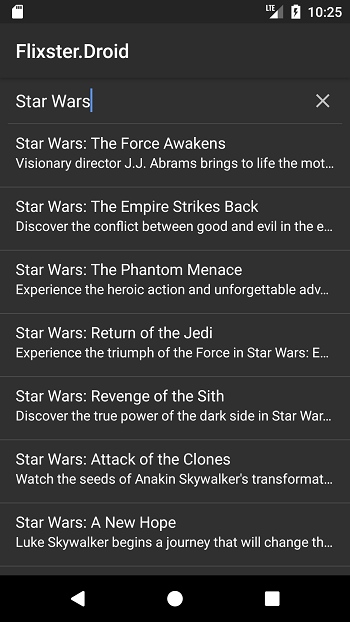
FilterMoviesAsyncinOnCreateso you start with an empty screen. - Run the app and type into the search box - you should see movies update!
protected override void OnCreate(Bundle savedInstanceState)
{
    ...
    var searchView = FindViewById<SearchView>(Resource.Id.searchView);
    searchView.QueryTextChange += OnSearch;
}

private async void OnSearch(object sender, SearchView.QueryTextChangeEventArgs e)
{
    await presenter.FilterMoviesAsync(e.NewText);
}
Optimizing the search experience
If you type different terms rather quickly, you might notice that the app bogs down, or even has incorrect search results. This is because you are always completing every search request and updating the UI. This happens even if you've replaced the term before the original search was finished.
This was a problem in iOS too - but iOS is often a bit faster than Android and can hide problems like this.
You can fix this by providing some type of cancellation. Unfortunately, your MovieService doesn't take a cancellation token, but you can use a CancellationToken in your presenter to implement this.
- Open the
MoviePresenterclass. - Add a new
CancellationTokenSourcefield to the class. Name it cts. - In the
FilterMoviesAsyncmethod, before you do any calls, use theCancelmethod on your token source if it's not null. - If the search term is not empty, create a new
CancellationTokenSourceand assign it to the cts field. - Capture the value of the token source by copying the value of the cts field into a captured local field so you have a copy of it in case a second invocation cancels this request and reassigns it. Name this captured version innerToken.
- Once the
MovieServicereturns, before you change the movie list, check the local innerToken and see if cancellation has been requested using theIsCancellationRequestedproperty. If it has, just return, otherwise invoke the event to change your movie listings.
If you need some help with this, check the code below for the full class implementation.
public class MoviePresenter
{
    private CancellationTokenSource cts;

    public event Action<IReadOnlyList<Movie>> FilterApplied;

    public async Task FilterMoviesAsync(string search)
    {
        cts?.Cancel();

        if (!string.IsNullOrEmpty(search))
        {
            var innerToken = cts = new CancellationTokenSource();
            var movieService = new MovieService();
            var movies = await movieService.GetMoviesForSearchAsync(search);

            if (!innerToken.IsCancellationRequested)
            {
                FilterApplied?.Invoke(movies);
            }
        }
        else
        {
            FilterApplied?.Invoke(null);
        }
    }
}
- Run the app again and see the performance improvement. On lower end devices it will be very evident.
Exercise summary
In this exercise, you created a new Xamarin.Android application using the Model-View-Presenter architectural style.
The Model was contained in the a separate assembly/layer. The View was created in an .AXML file. The Activity code behind acted as a part of the presenter by connecting the Views to your presenter class. The Presenter was a separate class owned by the Activity and performed the visual logic by pulling data from the MovieService.
You can view the completed solution in the Exercise 2 > Completed folder of your copy of the cloned or downloaded course materials.