Exercise 1: Apply MVC in an iOS application (XAM301)
This exercise walks you through building a new iOS application using the Model-View-Controller application style.

To complete the exercise, you will need Visual Studio for Windows or macOS with the Xamarin development tools installed. You will also need either an emulator/simulator or a device to run the exercise on. Please see the setup page if you need help installing the Xamarin development environment.
Create a new Xamarin.iOS project
Create a new project using Visual Studio for Mac:
- Launch Visual Studio for Mac.
- Select File > New Solution.
- Locate the iOS > App category.
- Choose the Single View App template.
Create a new project using Visual Studio for Windows:
- Launch Visual Studio for Windows.
- Select File > New > Project.
- Locate the Visual C# > iOS > iPhone category.
- Choose the Single-View App (iPhone) template.
Choose your project name and location
- Name the app QuickFlicks.iOS.
- Uncheck iPad from the Devices selection and click Next.
- Choose a location for the project.
- Use the default values for all other project settings.
- Click Create.
- Name the app QuickFlicks.iOS.
- Choose a location for the project.
- Use the default values for all other project settings.
- Click OK.
Run the application
- Build the app to make sure that it compiles.
- Run the app on a simulator, or a physical device.
- It should display an empty screen on your device.
Add the QuickFlicks.Data Library
Next, you'll need the QuickFlicks.Data code from the Asset folder in the downloaded code materials from GitHub. You need to add it to your solution, and then reference it from your iOS project you just created so it can pull the data you want to display.
Add the project to your solution using Visual Studio for Mac:
- Copy the Assets/QuickFlicks.Data folder into your solution folder.
- Add QuickFlicks.Data.csproj to the solution using Add > Add Existing Project.
- Build the solution to make sure everything builds properly.
- Next, add a reference to the QuickFlicks.Data project to your iOS project.
Add the project to your solution using Visual Studio for Windows:
- Copy the Assets/QuickFlicks.Data folder into your solution folder.
- Add QuickFlicks.Data.csproj to the solution using Add > Existing Project.
- Build the solution to make sure everything builds properly.
- Next, add a reference to the QuickFlicks.Data project to your iOS project.
Explore the QuickFlicks.Data project
The QuickFlicks.Data project is a .NET Standard library with three source files.
| File | Description |
|---|---|
Movie.cs |
This is a simple POCO (Plain old C# object) to represent a Movie in our app. This is our Model for the app. |
MovieService.cs |
This is a REST service client which uses the iTunes public web API to retrieve movie lists from Apple's servers. |
MovieSearchResponse.cs |
This is a JSON representation of the data coming back from iTunes. It's an internal class used to deserialize the response. |
- Open the MovieService.cs source file.
- You'll use the
GetMoviesForSearchAsyncmethod onMovieServiceto retrieve your data. It takes a search string and a page counter should you want to support multiple pages of data. By default, the service returns the top 25 hits for a given search pattern.
Add Newtonsoft JSON.NET package
The QuickFlicks.Data project uses the Newtonsoft.Json NuGet package, which means you'll need to add a reference to this package to each of your projects that use the data library.
-
Add a NuGet package reference to Newtonsoft.Json to your iOS project.
- You can either use the Package Manager console, or the GUI in Visual Studio.
PM> Install-Package Newtonsoft.Json
-
Add a NuGet package reference to Newtonsoft.Json to your iOS project.
- Right-click on the Packages folder and select Add Packages....
- Search for Newtonsoft.Json (it's often the first item in the list by default).
- Click Add Package to add it to your project.
Add a UITableViewController
The Single View template you used to create this application generated an iOS Storyboard with a single View + View Controller. You are going to replace that with a more sophisticated UITableViewController so you can display a list of movies.
- Open the file Main.storyboard.
- Use the zoom controls to make some room on the design surface.
- Drag a Table View Controller from the Toolbox onto the design surface.
- Drag the "initial view arrow" which is pointing to the original View Controller to your new Table View Controller.
- Click on the bottom bar of your Table View Controller to select the controller portion of the element.
- Open the Properties pane and verify that the Class value is current
UITableViewController. If it says something else, you have the wrong object selected. - Create a new code-behind class for the View Controller by changing the current Class to
MovieTableViewController. When you press Enter, a new class will be created and added to the project. - Just to cleanup, right-click on the original View Controller and select Delete to remove it from the Storyboard.
Add a SearchBar to the Table View
The UI will currently have a Table View to display a list of data. You'll add some movies in a moment. Complement the Table View by adding a UISearchBar to the top of the page.
- Close the Storyboard.
- In the Solution Explorer, if the ViewController.cs is still in the project, go ahead and delete it.
- Open the MovieTableViewController.cs file. It should be a class that derives from
UITableViewControllerand has a constructor.
This class is your View Controller which is the Controller part of the MVC pattern you are using in iOS. It's where all your interaction with the view will take place. You can create new child views in this class, wire up events to the views created in the Storyboard, and provide the logic for any user activity that occurs in the view.
- Add a new field to the class of type
UISearchControllernamed searchController.
public partial class MovieTableViewController : UITableViewController
{
   private UISearchController searchController;
   ...
}
Notice that you are adding a controller class here - not a view. Although you could add a view and provide the logic for it in your existing View Controller, Apple creates controllers intended to manage specific composite controls such as theUISearchBarthat provide the logic necessary to drive the search experience. Your main view controller for the app (theUITableViewControllerin this case) can then benefit from the separation of concerns and only deal with the data from the search bar.
- Override the
ViewDidLoadmethod. Recall that this is called by the View when it has been loaded from the Storyboard and is ready to be displayed to the user. - After the call to the base implementation, assign a new
UISearchControllerto your field.
Important You need to use the constructor that takes a searchResultsController. The easiest way to do this (and get it right) is to use a parameter name assignment in the constructor as shown below. Do not use the default (empty) constructor as it will not create the view properly and you'll get an exception at runtime.
searchController = new UISearchController(searchResultsController: null);
-
Set the following properties on the
UISearchController:- set
HidesNavigationBarDuringPresentationtofalse. - set
ObscuresBackgroundDuringPresentationtofalse. - set
SearchBar.Placeholderto"Search Movies".
- set
Does the setting of Placeholder violate the Principle of Least Knowledge? Why not?
searchController = new UISearchController(searchResultsController: null)
{
    HidesNavigationBarDuringPresentation = false,
    ObscuresBackgroundDuringPresentation = false
};

searchController.SearchBar.Placeholder = "Search Movies";
- Finally, assign the
UISearchBaras the Table View's header view. You can get to the View for the Table View through the built-inTableViewproperty (this is part of theUITableViewController).
TableView.TableHeaderView = searchController.SearchBar;
- If you run the application, you should see a search bar at the top of the view.

Retrieve a list of movies based on a search term
Next, use the MovieService to retrieve some movies and display them in the Table View through your Table View Controller.
-
Add a new field to the
MovieTableViewControllerof typeIReadOnlyList<Movie>and name it movies.- You'll need to add a
using System.Collections.Genericto use this collection type.
- You'll need to add a
-
Add a new private method to the class named
UpdateMovieListingswhich you'll use to update your movie list.- It should return a
System.Threading.Tasks.Task - It should take a
stringparameter namedsearchTerm
- It should return a
-
Have the method create a new
MovieServiceobject and use theGetMoviesForSearchAsyncmethod to get a set of movies for the given search term.- Since this method returns a
Task, use theasyncandawaitkeywords to get the final result. - Assign the results of the call to your movies field.
- If the search term is empty, there's no need to call the method since it won't return anything - just set the movies field to
null.
- Since this method returns a
private async Task UpdateMovieListings(string searchTerm)
{
    if (!string.IsNullOrEmpty(searchTerm))
    {
        var movieService = new MovieService();
        movies = await movieService.GetMoviesForSearchAsync(searchTerm);
    }
    else
    {
        movies = null;
    }
}
Note Sometimes Visual Studio will get confused with the use ofIReadOnlyList<T>because you're using a .NET Standard library - it might underline the call toGetMoviesForSearchAsyncin RED and indicate you need a reference toSystem.Runtimeto use this type. This is an intellisense error, not a compile error - your app will build and run just fine and you can ignore Visual Studio in this case.
Populate our Table View with Movies
The UITableViewController is designed to work with a UITableView. The Table View itself follows the Separation of Concerns principle by having its data be supplied by an external Data Source object. This can either be an independent class, or in the case of the UITableViewController, it can be provided through two virtual methods:
| Method | Description |
|---|---|
RowsInSection |
Returns the number of items to display. |
GetCell |
Returns the View to represent a single item. |
Xamarin University has several classes which show you how to work with the UITableView class - make sure to check out IOS110 - Fundamentals of Table Views, IOS115 - Customizing Table Views, and IOS215 - Editing Table Views classes to get all the details!
For simplicity, you'll use this latter approach to supply the data, but it's a good exercise to try separating out the data source on your own.
- Override the
RowsInSectionmethod and return the number of movies in your movies collection. Remember it could benullso either do a deliberate null-check, or use the null-coalescing operator to return zero.
public override nint RowsInSection(UITableView tableView, nint section)
{
    return movies?.Count ?? 0;
}
- Table View cells are reused for performance, but you need a unique key to name the cell you design. Use the DRY principle and add an
NSStringfield to your class named CellId with the value"MovieCell".
private NSString CellId = new NSString("MovieCell");
- Override the
GetCellmethod and use the following code to manage the creation and reuse of the view for a single movie:
public override UITableViewCell GetCell(UITableView tableView, NSIndexPath indexPath)
{
    var cell = tableView.DequeueReusableCell(CellId);
    if (cell == null)
    {
        cell = new UITableViewCell(UITableViewCellStyle.Subtitle, CellId);
    }

    var movie = movies[indexPath.Row];
    cell.TextLabel.Text = movie.Title;
    cell.DetailTextLabel.Text = movie.Description;

    return cell;
}
-
In your
UpdateMovieListingsmethod, at the very end after the movies field has been assigned, add a call toTableView.ReloadDatato force the Table View to refresh its view of the collection. -
Finally, test this out by adding a call to
UpdateMovieListingsat the end of theViewDidLoadmethod and pass in your favorite movie or search term. You will need to mark the method asasynctoawaittheTask.
await UpdateMovieListings("Star Wars");
- Run the app and see the results.
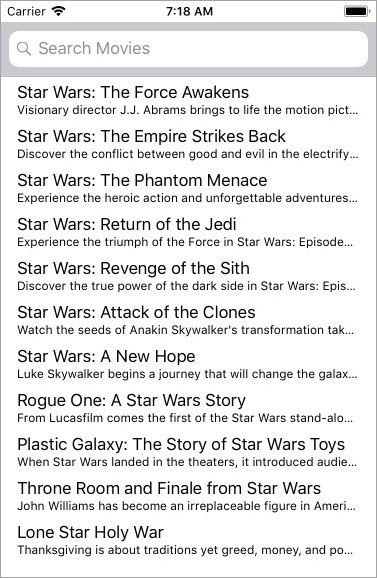
Add filtering to the movie list
-
Have the Table View Controller implement the
IUISearchResultsUpdatinginterface. This has a single methodUpdateSearchResultsForSearchControllerwhich is called by theSearchBarwhen you type something into the field.- Use the Implement Interface refactoring support built into Visual Studio to get the method signature - just right-click on the class/interface and to see the implement option.
- In the method, get the search term from the passed
searchControllerparameter. You'll have to get theTextvalue from the childSearchBarproperty. In this case, it's allowed because you created the search controller and actually have it in an instance field.
-
Pass the retrieved search term to your
UpdateMovieListingsmethod and await the task. -
Finally, hook up the search implementation. You need to set the
SearchResultsUpdaterproperty on theUISearchControlleras part of the initial construction. Set the property tothisto indicate that your Table View Controller implements the logic.
public partial class MovieTableViewController : UITableViewController, IUISearchResultsUpdating
{
   ...
   public override void ViewDidLoad()
   {
      ...
      searchController = new UISearchController(searchResultsController: null)
      {
         HidesNavigationBarDuringPresentation = false,
         ObscuresBackgroundDuringPresentation = false,
         SearchResultsUpdater = this,
      };
      ...
   }

   public async void UpdateSearchResultsForSearchController(UISearchController searchController)
   {
      var searchTerm = searchController.SearchBar.Text;
      await UpdateMovieListings(searchTerm);
   }
}
-
You can remove the initial test call to
UpdateMovieListingsinViewDidLoadif you want, that way your table view starts out empty. - Run the app and type in a search term. You should see it update as you type!
Exercise summary
In this exercise, you created a new Xamarin.iOS application using the Model-View-Controller architectural style.
- The Model was contained in the a separate assembly/layer.
- The View was created in a Storyboard.
- The Controller supplemented the View with a new SearchBar (showing we can add to the View from the Controller)
- The Controller then provided the connected between the retrieval of models (through the data layer) and presented them to the View in the form of rows in a Table View.
You can view the completed solution in the Exercise 1 > Completed folder of your copy of the cloned or downloaded course materials.