Exercise 1: Determine your database file path
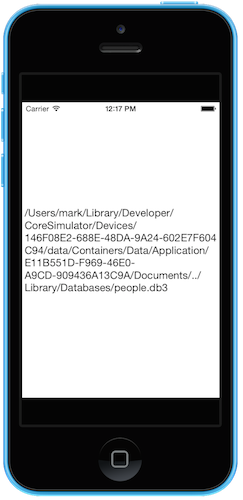
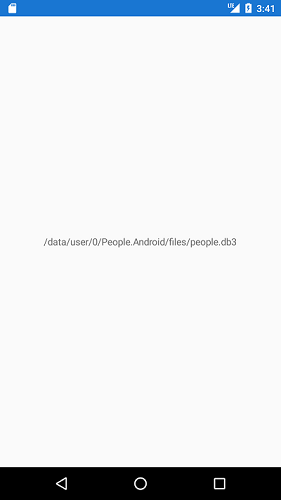
In this exercise, you will create a new Xamarin.Forms application and determine the location to store a database file on each platform. We are going to initially display the full path to where we want to store the file as a Label as shown here:
To complete the exercise, you will need Visual Studio for Windows or macOS with the Xamarin development tools installed. You will also need either an emulator/simulator or a device to run the exercise on. Please see the setup page if you need help installing the Xamarin development environment.
Create the solution
We're going to start by creating a new Xamarin.Forms application using the Portable Class Library template.
- Create a new Xamarin.Forms application. You'll find the project template under Visual C# > Cross-Platform > Cross Platform App (Xamarin.Forms).
- The app will eventually store information about people you know so name the app People.
- Click OK to get to the next page of the wizard.
-
On the New Cross Platform App page, verify several settings.
- Ensure Blank App is selected for the template.
- Choose Xamarin.Forms under UI Technology.
- Select .NET Standard under Code Sharing Strategy
- Click OK to create your Xamarin.Forms application.
- Make sure the app builds and runs properly—it will display a "Hello Forms" message.
You may need to change the configuration drop-down—for example, iOS requires "iPhone" or "iPhoneSimulator", and Windows projects typically must be "x86" or "x64".
- Create a new Xamarin.Forms application. You'll find the the project template under Multiplatform > App > Blank Forms App. Make sure C# is selected in the drop-down and click the Next button to start the project wizard.
- The app will eventually store information about people you know so name the app People.
- Ensure the Use Portable Class Library radio button is selected and make sure the option to use XAML is selected
- Click Next to move to the next screen.
- On the Configure your new Forms App screen, leave the default settings and click Create to create the project.
Visual Studio for Mac currently generates slightly different code from the template. In particular, it will name the XAML page and code-behind PeoplePage.xaml. Perform the following steps to make it unify it with what is generated by Visual Studio for Windows (so you can follow the rest of the lab instructions).
- Rename PeoplePage to MainPage. Open the code-behind file, select the class name and use ⌘+R or right-click on the type name and use Refactor > Rename. Make sure the checkbox to rename the file is selected (if you forget, it's ok—just rename both the .xaml and .xaml.cs file in the solution explorer window too).
- Make sure the app builds and runs properly, displaying a welcome message.
Add platform-specific code
We'll add a new class to each platform specific project that will return a reasonable path that can be used to store a database file.
- Add a new class named
FileAccessHelperto each of the platform-specific projects. Ensure this class in each project ispublic. - Add a
staticmethod namedGetLocalFilePaththat accepts astringparameter namedfilenameand returns astring. Make sure you add this method to each platform.
Note you can create the file in one project and then copy it into the other platform-specific projects to save some time and typing - just make sure to change the namespace and using statements to suite each platform.
public class FileAccessHelper
{
    public static string GetLocalFilePath(string filename)
    {

    }
}
-
Implement each of the
GetLocalFilePathmethods. The input parameter is the desired filename for the database. Return the combined folder location and database file name.- On Android, retrieve the
Personalfolder using theSystem.Environment.GetFolderPathmethod.
- On Android, retrieve the
string path = System.Environment.GetFolderPath(
    System.Environment.SpecialFolder.Personal);
return System.IO.Path.Combine(path, filename);
- On iOS, store the database in the Library folder. Again, start by retrieving the
Personalfolder usingSystem.Environment.GetFolderPath. Then go up one folder level and navigate to Library. Hint: useSystem.IO.Path.Combine.
string docFolder = Environment.GetFolderPath(Environment.SpecialFolder.Personal);
string libFolder = System.IO.Path.Combine(docFolder, "..", "Library");

if (!System.IO.Directory.Exists(libFolder)) {
    System.IO.Directory.CreateDirectory(libFolder);
}

return System.IO.Path.Combine(libFolder, filename);
- For any of the supported Windows platforms, the folder location can be found using
Windows.Storage.ApplicationData.Current.LocalFolder.Path.
string path = global::Windows.Storage.ApplicationData.Current.LocalFolder.Path;
return System.IO.Path.Combine(path, filename);
Display the path
We'll show the fully qualified path using the Label created by default with the Xamarin.Forms new project template. We need to make a few small changes to make this happen.
-
First, let's make the
Labelaccessible to our code behind.- Open the
MainPage.xamlfile in the PCL project. - Locate the single
Labelchild. - Add an
x:Nameattribute and name the label textLabel.
- Open the
-
Next, open the C#
MainPagecode-behind class in the PCL project.- Add a new public property named Text and have the get/set operators retrieve and change the value of the
textLabel.Textvisual property.
- Add a new public property named Text and have the get/set operators retrieve and change the value of the
public partial class MainPage : ContentPage
{
    public string Text
    {
        get { return textLabel.Text; }
        set { textLabel.Text = value; }
    }

    public MainPage()
    {
        InitializeComponent();
    }
}
-
Open the C#
Applicationclass in the PCL project.- Change the
Appconstructor to accept astringparameter named displayText. - After the
MainPageis created, set theTextproperty to the value passed into the constructor.
- Change the
public App(string displayText)
{
    InitializeComponent();

    MainPage = new People.MainPage()
    {
        Text = displayText
    };
}
Pass platform-specific data to shared code
Our final step is to pass the database path from the platform-specific projects to the PCL so it can be displayed.
- In each platform-specific project, find the code that instantiates the App class. This will be different on each platform.
- Call the static
FileAccessHelper.GetLocalFilePathmethod that you created earlier and pass in people.db3 as the file name parameter. - Pass the returned fully qualified filename into the App's constructor.
On iOS, this will be done in the AppDelegate:
public partial class AppDelegate : global::Xamarin.Forms.Platform.iOS.FormsApplicationDelegate
{
   ...
   public override bool FinishedLaunching(UIApplication app, NSDictionary options)
   {
      global::Xamarin.Forms.Forms.Init();
      string dbPath = FileAccessHelper.GetLocalFilePath("people.db3");
      LoadApplication(new App(dbPath));
      return base.FinishedLaunching(app, options);
   }
}
On Android, the App class is instantiated in the MainActivity:
public class MainActivity : global::Xamarin.Forms.Platform.Android.FormsApplicationActivity
{
   protected override void OnCreate(Bundle bundle)
   {
      ...
      base.OnCreate(bundle);
      global::Xamarin.Forms.Forms.Init(this, bundle);
      string dbPath = FileAccessHelper.GetLocalFilePath("people.db3");
      LoadApplication(new App(dbPath));
   }
}
On Windows, the App class is instantiated in the code-behind for MainPage:
public partial class MainPage : global::Xamarin.Forms.Platform.WinPhone.FormsApplicationPage
{
   public MainPage()
   {
       this.InitializeComponent();
       string dbPath = FileAccessHelper.GetLocalFilePath("people.db3");
       LoadApplication(new People.App(dbPath));
   }
}
Run the application
Run the application on each platforms. They should all display the fully qualified database file path.
Remember to select a build configuration for each platform. For example, Windows UWP requires either x86 or x64 and iOS requires either iPhone or iPhoneSimulator.

Exercise summary
In this exercise, you retrieved the platform-specific database paths for each platform and displayed the result with the main page of the app. In a later exercise, you will extend this solution to connect to SQLite.
You can view the completed solution in the Exercise 1 > Completed folder of your copy of the cloned or downloaded course materials.