Exercise 1: Determine the network connectivity
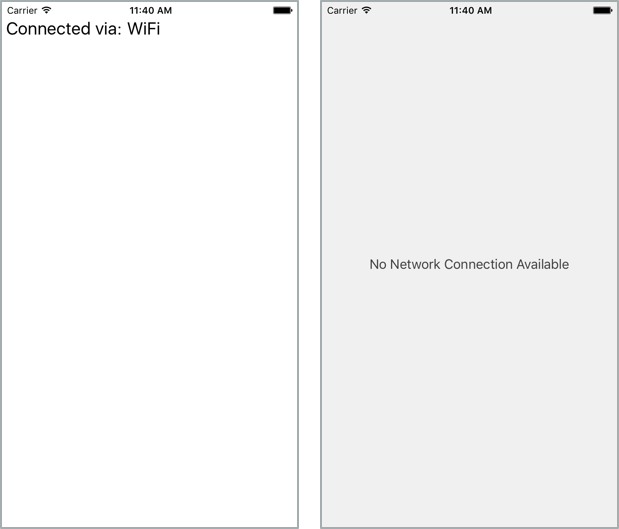
The primary goal of this lab will be to create a new Xamarin.Forms application and utilize the Xam.Plugin.Connectivity component to detect the network availability and state. You will display the current network status on two pages as shown in the screenshots below.
To complete the exercise, you will need Visual Studio for Windows or macOS with the Xamarin development tools installed. You will also need either an emulator/simulator or a device to run the exercise on. Please see the setup page if you need help installing the Xamarin development environment.
Create the solution
Let's start by creating a new Xamarin.Forms application with Visual Studio.
Using Visual Studio, create a new Xamarin.Forms Blank Forms App application. Name it NetStatus.
Make sure you select Use Portable Class Library under Shared Code to match up with the rest of the instructions of this course's exercises.
Using Visual Studio, create a new Mobile App (Xamarin.Forms) application. Name it NetStatus.
Make sure you select the .NET Standard under Code Sharing Strategy to match up with the rest of the instructions of this course's exercises.
Add the Connectivity plugin
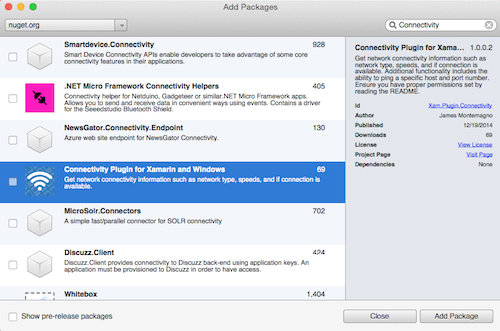
Add the NuGet package Xam.Plugin.Connectivity to all of your projects.
To add this NuGet package via the Package Manager Console, found in the menu under Tools > NuGet Package Manager > Package Manager Console, run the following command:
Install-Package Xam.Plugin.Connectivity
This adds an abstraction to detect network state for iOS, Android and Windows devices at runtime.
You can examine the source code to the Connectivity plugin available on GitHub.
Add Android permissions
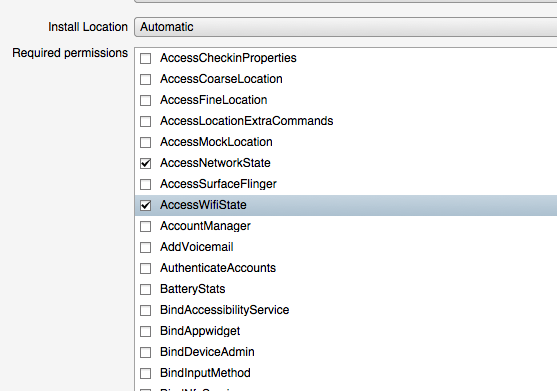
Android requires applications request specific permissions in the manifest in order to check for network connectivity.
If you plan to run the application on an Android device then add the ACCESS_NETWORK_STATE and ACCESS_WIFI_STATE permissions to the Android manifest (accessible through the Android Application tab in the project properties, or by opening the Properties/AndroidManifest.xml file).
Add Windows capabilities
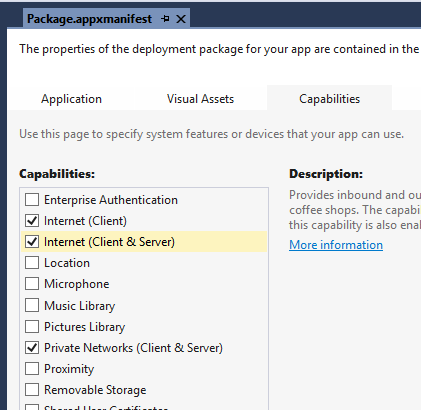
Windows 10 UWP must have the Private Networks (Client & Server) capability and Internet (Client & Server) capability checked in the app manifest (Package.appxmanifest) to work with network features on the device.
Open the manifest in the Windows project, switch to the Capabilities tab and check these two options.
Create the no-network page
The app will have two pages: One for when we are connected to a network, and another to display a "No connection available" view. Here we will create the "No connection available" page.
- Add a new Xamarin.Forms > ContentPage (C#) item to the shared NetStatus project. Name it
NoNetworkPage.
- Add a new Forms > Forms ContentPage item to the shared NetStatus project. Name it
NoNetworkPage.
- In the constructor for the class, set the
Contentproperty to a newLabelwhich is centered and displays the text "No Network Connection Available". - Set the text color to the RGB value (0x40,0x40,0x40) to make it a dark gray color.
- Set the
BackgroundColorfor the page to be the RGB value (0xf0,0xf0,0xf0) to make it a light gray color.
public class NoNetworkPage : ContentPage
{
    public NoNetworkPage()
    {
        BackgroundColor = Color.FromRgb(0xf0, 0xf0, 0xf0);
        Content = new Label() {
            Text = "No Network Connection Available",
            HorizontalOptions = LayoutOptions.Center,
            VerticalOptions = LayoutOptions.Center,
            TextColor = Color.FromRgb(0x40, 0x40, 0x40),
        };
    }
}
- Set the
MainPageproperty in the App.cs file to the newNoNetworkPage. - Run the application to verify that it is displayed properly.
Create the network-view page
Next we will create the page that will display the connection type when one is available.
-
Add a page named
NetworkViewPage, you can use either C# code or a mix of XAML and code. This will be the page where we display the network type (WiFi vs. Cellular) and provide a way to ping a host or IP address (a feature included in the connectivity library we added earlier). -
Add a
Labelto the page. TheLabelwill display the current connection type to the user. Name itConnectionDetails. Feel free to use whatever sizing / spacing you prefer. You can also deviate from the names if you like - they are provided just for comparison to the provided lab solution.
Detect the network connectivity
Next we will determine the current state of the network and display the appropriate page to the user.
- Open the App.cs file. You will be adding code to the
App's constructor. - Use the
CrossConnectivity.Current.IsConnectedstatic property to determine the network state. Based on the state, set theMainPageproperty to either our "No-network" screen or the "Network-view" page. - Run the application with the network disabled on the device and verify that it displays the correct page on launch. (Note that the iOS Simulator will still appear to have network capabilities even when airplane mode is enabled; you will have to disable the host machine's network connection.)
- Close the application. Enable the network on the device and run the app again - verify that it launches the other page.
...
using Plugin.Connectivity.Abstractions;

public App()
{
   // The root page of your application
   MainPage = CrossConnectivity.Current.IsConnected
        ? (Page) new NetworkViewPage()
        : new NoNetworkPage();
}
Monitor connectivity changed
Now we need to add code to switch between the pages when the network status changes. We will use the CrossConnectivity.Current.ConnectivityChanged static event to detect network changes. The event args, ConnectivityChangedEventArgs, includes a Boolean indicating whether there is an active connection.
- Override the
Application.OnStartmethod in your App.cs class. - In
OnStart, subscribe to theCrossConnectivity.Current.ConnectivityChangedevent. - In your handler, check the connected state and update the
MainPageproperty to reflect the connection state. - Run the app. Change the network availability while the app is running - it should now switch pages dynamically as you enable and disable the network connectivity.
protected override void OnStart()
{
    base.OnStart();
    CrossConnectivity.Current.ConnectivityChanged += HandleConnectivityChanged;
}

void HandleConnectivityChanged (object sender, ConnectivityChangedEventArgs e)
{
    Type currentPage = this.MainPage.GetType();
    if (e.IsConnected && currentPage != typeof(NetworkViewPage))
        this.MainPage = new NetworkViewPage();
    else if (!e.IsConnected && currentPage != typeof(NoNetworkPage))
        this.MainPage = new NoNetworkPage();
}
Display the network type
In this final step, we will display the current network type when we have a connection. We might want to know this to determine if we should download a large amount of content or perform some type of network activity only when WiFi is active.
- Open the
NetworkViewPagecode file. - Override the
OnAppearingmethod. - In
OnAppearing, set theConnectionDetailslabel to show the type of the first connection in theCrossConnectivity.Current.ConnectionTypeslist.
using System.Linq;
...
protected override void OnAppearing()
{
    base.OnAppearing();

    ConnectionDetails.Text = CrossConnectivity.Current.ConnectionTypes.First().ToString();
}
- Still in
OnAppearing, subscribe a handler to theConnectivityChangedevent. - In your handler, set the
ConnectionDetailslabel to the current network type just as you did inOnAppearing(feel free to refactor to avoid duplicate code if you would like to). - Override the
OnDisappearingmethod and unsubscribe from the event. This will ensure we don't have a memory leak since the event is static. - Run the app and try switching between WiFi and Cellular (best tested on a physical phone device, many emulators/simulators do not support this capability).
protected override void OnAppearing()
{
    base.OnAppearing();

    if(CrossConnectivity.Current == null)
        return;

    ConnectionDetails.Text = CrossConnectivity.Current.ConnectionTypes.First().ToString();

    CrossConnectivity.Current.ConnectivityChanged += UpdateNetworkInfo;
}

protected override void OnDisappearing()
{
    base.OnDisappearing();

    if(CrossConnectivity.Current != null)
      CrossConnectivity.Current.ConnectivityChanged -= UpdateNetworkInfo;
}

private void UpdateNetworkInfo(object sender, ConnectivityChangedEventArgs e)
{
    if (CrossConnectivity.Current != null && CrossConnectivity.Current.ConnectionTypes != null)
    {
        var connectionType = CrossConnectivity.Current.ConnectionTypes.FirstOrDefault ();
        ConnectionDetails.Text = connectionType.ToString ();
    }
}
Exercise summary
In this exercise, you have successfully detected the network state and transitioned your application to and from different screens based on the connectivity available.
You can view the completed solution in the Exercise 1 > Completed folder of your copy of the cloned or downloaded course materials.