Exercise 1: Create a XAML-based calculator
This exercise will take an existing Xamarin.Forms application (a calculator app) and convert the user interface definition from C# to XAML.
You will start with an application that displays a calculator and allows you to perform simple calculations. In the starter solution, the UI is completely defined in C# as you have done up to this point. Our goal is to convert this UI into XAML. This is a standard Xamarin.Forms application with a Portable Class Library for the shared UI and logic, and platform-specific projects for iOS, Windows, and Android.


To complete the exercise, you will need Visual Studio for Windows or macOS with the Xamarin development tools installed. You will also need either an emulator/simulator or a device to run the exercise on. Please see the setup page if you need help installing the Xamarin development environment.
Add a new XAML ContentPage to the PCL
We'll replace the existing code based MainPage with a new XAML version.
- Start by opening the Exercise 1 > Start Calculator project from your copy of the cloned or downloaded course materials and verify it builds and runs in your environment (any platform is fine).
-
Open the
MainPage.csfile. This is the existing UI definition which is done in C# code.
- Let's rename this class first - so we can create a duplicate, but defined in XAML. Right-click on the
MainPageclass name and select Refactor > Rename; or use Command+R while the cursor is on the class name. You can name it whatever you like, the lab assumes you have named it "OldMainPage".
- Let's rename this class first - so we can create a duplicate, but defined in XAML. Right-click on the
MainPageclass name and select Rename (Refactor > Rename on older Visual Studio versions); or use Ctrl+R,R while the cursor is on the class name. You can name it whatever you like, the lab assumes you have named it "OldMainPage".
- Compile the app and make sure it builds - you don't need to run it, just make sure nothing is broken before you continue.
-
Next, let's add a new XAML page where we will put the new UI definition.
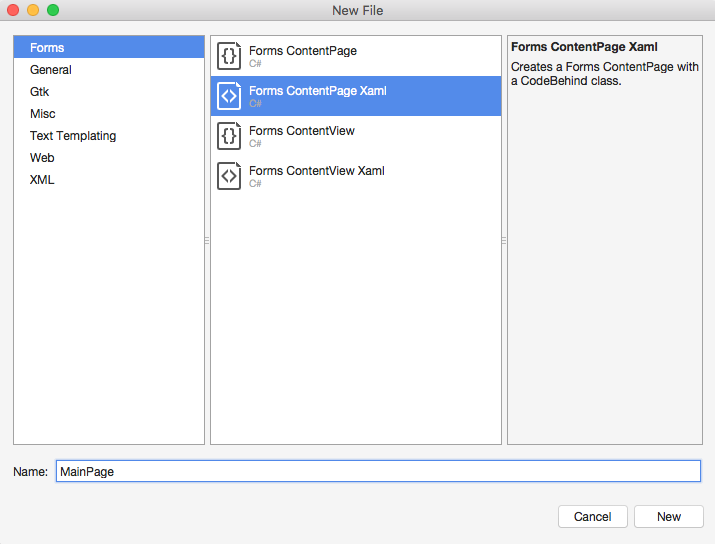
- Add a new file to the PCL project.
- Select the Forms > Forms ContentPage Xaml template.
- Name the new file MainPage as shown below.
-
Next, let's add a new XAML page where we will put the new UI definition.
- Add a new file to the PCL project.
- Select the Visual C# > Xamarin.Forms > Content Page template. (Older Visual Studio versions may have this template named Forms ContentPage Xaml.)
- Name the new file MainPage as shown below.

Add a grid
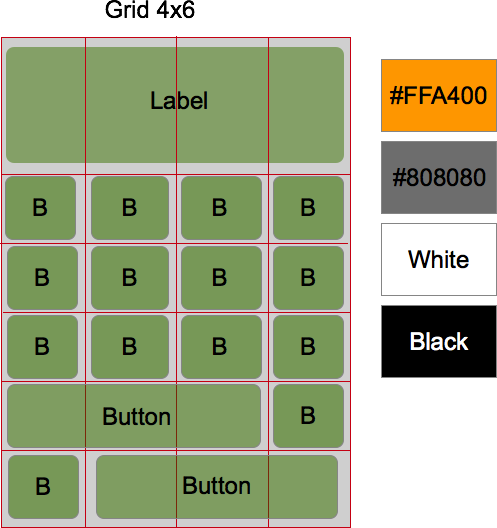
Take a look at the images below as guidance for the grid we will create. We'll use a Grid to layout the required controls.
- Start by opening MainPage.xaml. This is the markup file which we will use to describe our UI.
- Add a
Gridas the first child tag in theContentPage, if there is an existingLabeljust replace it with theGrid.
Note: Depending on the version of the IDE you are using, it may have a tag namedContentPage.Contentas the first child tag, or it might be aLabel. As you will see a bit later, the default child property for theContentPageisContent, which means you can just place the child right into theContentPageand omit theContentPage.Contentvalue. The below code block has removed the tag, but it's ok to leave it in place - just make sure yourGridis in between the open and close tags.
- Set the following properties on the
Grid
| Property | Value |
|---|---|
Padding |
"5,0" |
RowSpacing |
"1" |
ColumnSpacing |
"1" |
BackgroundColor |
"Black" |
<?xml version="1.0" encoding="UTF-8"?>
<ContentPage x:Class="Calculator.MainPage"
    xmlns="http://xamarin.com/schemas/2014/forms"
    xmlns:x="http://schemas.microsoft.com/winfx/2009/xaml">

    <Grid Padding="5,0" RowSpacing="1" ColumnSpacing="1" BackgroundColor="Black">
    </Grid>
</ContentPage>
Customize the grid
- Add
RowDefinitionandColumnDefinitionelements to create a 4x6 grid. - We want 4 columns and 6 rows, with the first row being 2X the size of all the others.
- All of the columns should be equally sized.
Here's the first row and column definition to show you the syntax:
<Grid ...>
   <Grid.RowDefinitions>
      <RowDefinition Height="2*" />
   </Grid.RowDefinitions>

   <Grid.ColumnDefinitions>
      <ColumnDefinition Width="*" />
   </Grid.ColumnDefinitions>
</Grid>
<?xml version="1.0" encoding="UTF-8"?>
<ContentPage x:Class="Calculator.MainPage"
            xmlns="http://xamarin.com/schemas/2014/forms"
            xmlns:x="http://schemas.microsoft.com/winfx/2009/xaml">

    <Grid Padding="5,0" RowSpacing="1" ColumnSpacing="1" BackgroundColor="Black">
       <Grid.RowDefinitions>
          <RowDefinition Height="2*" />
          <RowDefinition Height="*" />
          <RowDefinition Height="*" />
          <RowDefinition Height="*" />
          <RowDefinition Height="*" />
          <RowDefinition Height="*" />
       </Grid.RowDefinitions>

       <Grid.ColumnDefinitions>
          <ColumnDefinition Width="*" />
          <ColumnDefinition Width="*" />
          <ColumnDefinition Width="*" />
          <ColumnDefinition Width="*" />
       </Grid.ColumnDefinitions>
    </Grid>

</ContentPage>
Add a label
- Add a
Labelinto the first row; have it span all four columns by setting theGrid.ColumnSpanproperty, and set the following properties:
| Property | Value |
|---|---|
Grid.Row (optional, default is first row) |
"0" |
Grid.ColumnSpan |
"4" |
FontAttributes |
"Bold" |
FontSize |
"48" |
BackgroundColor |
"Black" |
Text |
"0" |
TextColor |
"White" |
HorizontalTextAlignment |
"End" |
VerticalTextAlignment |
"Center" |
LineBreakMode |
"NoWrap" |
<Label FontAttributes="Bold" FontSize="48" BackgroundColor="Black" Text="0"
              TextColor="White" HorizontalTextAlignment="End" VerticalTextAlignment="Center"
              LineBreakMode="NoWrap" Grid.ColumnSpan="4" />
Add buttons
- Add all of the buttons into the UI, placing them into each row and column of the
Gridas appropriate. - Set the
BackgroundColorandTextColorof eachButtonbased on the screenshots shown earlier. - For each button set the
FontSizeto"36"and theBorderRadiusto"0".
<Button Text="7" Grid.Row="1" Grid.Column="0"
       BackgroundColor="White" TextColor="Black"
       FontSize="36" BorderRadius="0" />
<Button Text="8" Grid.Row="1" Grid.Column="1"
       BackgroundColor="White" TextColor="Black"
       FontSize="36" BorderRadius="0" />
<Button Text="9" Grid.Row="1" Grid.Column="2"
       BackgroundColor="White" TextColor="Black"
       FontSize="36" BorderRadius="0" />

<Button Text="4" Grid.Row="2" Grid.Column="0"
       BackgroundColor="White" TextColor="Black"
       FontSize="36" BorderRadius="0" />
<Button Text="5" Grid.Row="2" Grid.Column="1"
       BackgroundColor="White" TextColor="Black"
       FontSize="36" BorderRadius="0" />
<Button Text="6" Grid.Row="2" Grid.Column="2"
       BackgroundColor="White" TextColor="Black"
       FontSize="36" BorderRadius="0" />

<Button Text="1" Grid.Row="3" Grid.Column="0"
       BackgroundColor="White" TextColor="Black"
       FontSize="36" BorderRadius="0" />
<Button Text="2" Grid.Row="3" Grid.Column="1"
       BackgroundColor="White" TextColor="Black"
       FontSize="36" BorderRadius="0" />
<Button Text="3" Grid.Row="3" Grid.Column="2"
       BackgroundColor="White" TextColor="Black"
       FontSize="36" BorderRadius="0" />
<Button Text="0" Grid.Row="4" Grid.Column="0" Grid.ColumnSpan="3"
       BackgroundColor="White" TextColor="Black"
       FontSize="36" BorderRadius="0" />

<Button Text="/" Grid.Row="1" Grid.Column="3"
        BackgroundColor="#FFA500" TextColor="White"
        FontSize="36" BorderRadius="0" />
<Button Text="X" Grid.Row="2" Grid.Column="3"
        BackgroundColor="#FFA500" TextColor="White"
        FontSize="36" BorderRadius="0" />
<Button Text="-" Grid.Row="3" Grid.Column="3"
        BackgroundColor="#FFA500" TextColor="White"
        FontSize="36" BorderRadius="0" />
<Button Text="+" Grid.Row="4" Grid.Column="3"
        BackgroundColor="#FFA500" TextColor="White"
        FontSize="36" BorderRadius="0" />

<Button Text="C" Grid.Row="5" Grid.Column="0"
        BackgroundColor="#808080" TextColor="White"
        FontSize="36" BorderRadius="0" />

<Button Text="=" Grid.Row="5" Grid.Column="1" Grid.ColumnSpan="3"
        BackgroundColor="#FFA500" TextColor="White"
        FontSize="36" BorderRadius="0" />
Display the XAML ContentPage
- Open the App.cs in the Portable Class Library (PCL) project.
- Instantiate a new instance of
MainPagein the constructor and assign it to theMainPageproperty. This should replace the existingOldMainPageinstantiation. - Run the application and make sure it displays the calculator UI - it won't be functional yet since we've not wired up any behavior, but it should look identical to how we started.
public class App : Application
{
    public App()
    {
        MainPage = new MainPage();
    }
}
If you are getting compile errors mentioning ContentPageViewModel. Open your MainPage.xaml.cs file and delete or comment out the line setting up the BindingContext.
public MainPage()
{
    InitializeComponent();
    // BindingContext = new ContentPageViewModel();
}
The ContentPage template in some versions of Visual Studio generates with a backing view model, but there is a name mismatch between the view model class and the creation of the view model in the page constructor; this causes a compile error that you will have to fix before the build process can even begin the XAML compilation process.
Exercise summary
Congratulations! In this exercise, you have converted a code-based UI into a XAML-based UI.You can view the completed solution in the Exercise 1 > Completed folder of your copy of the cloned or downloaded course materials.