Exercise 3: Adding support for dialing the phone
The goal of this exercise is to add platform-specific behavior into our Phoneword application to display an alert and let the user dial the phone.
This exercise is a continuation of the previous exercise. You can use your existing solution or begin from the prior Exercise 2 > Completed solution in your copy of the cloned or downloaded course materials.
There are also several assets you will need to add to your projects during the exercise which are contained in the Exercise 3 > Assets folder.
To complete the exercise, you will need Visual Studio for Windows or macOS with the Xamarin development tools installed. You will also need either an emulator/simulator or a device to run the exercise on. Please see the setup page if you need help installing the Xamarin development environment.
Add an event handler to the call button
- Open MainPage.cs in the Phoneword library and locate the constructor.
-
Subscribe a handler to the
Clickedevent of the CallButton; this should be added after the currenttranslateButton.Clickedhandler. -
In the completed project, a method named
OnCallis used to subscribe toClicked. This method must accept anobjectand anEventArgs.
public MainPage()
{
   translateButton.Clicked += OnTranslate;
   callButton.Clicked += OnCall;
   this.Content = panel;
}

...

void OnCall(object sender, System.EventArgs e)
{

}
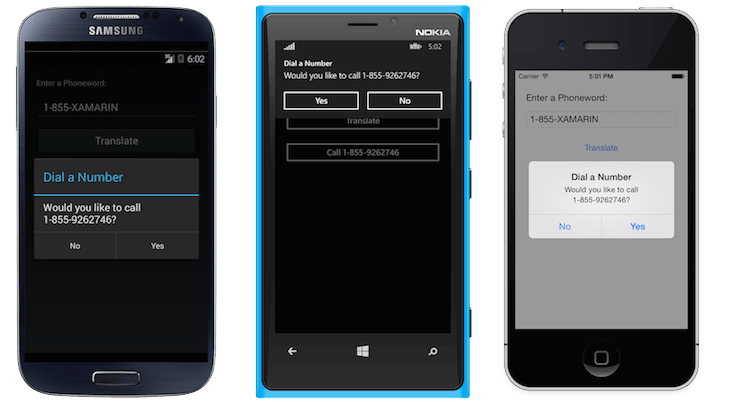
Display an alert
The following steps will add the logic to the OnCall method.
-
Prompt the user using
Page.DisplayAlertto ask if they'd like to dial the number. -
The
DisplayAlertmethod returns aTask; add theasynckeyword to OnCall andawaitthe call toDisplayAlert.DisplayAlerttakes a Title, Message and two strings used for the Accept and Cancel button text. It returns a boolean indicating whether the Accept Button was pressed to dismiss the dialog.
Use the following parameters:
| Property | Value |
|---|---|
| Title | "Dial a Number" |
| Message | "Would you like to call xxxx", using the translated number. |
| "Yes" and "No" | For the Accept and Cancel buttons. |
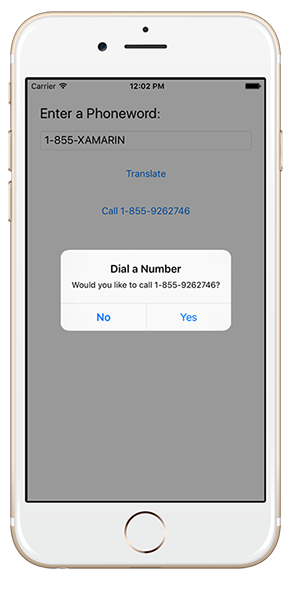
async void OnCall(object sender, System.EventArgs e)
{
    if (await this.DisplayAlert(
        "Dial a Number",
        "Would you like to call " + translatedNumber + "?",
        "Yes",
        "No"))
    {
        // TODO: dial the phone
    }
}
Run the application
- Build and run on any platform. It should display the alert and allow you to dismiss it with either a Yes or No response.
Create an abstraction
Next, let's create the abstraction for dialing the phone.
- Create a public interface named
IDialerin the shared library. - Define a single method named
DialAsyncthat accepts the phone number as astringand returns aboolto indicate whether the call was successful. - This will be an async method; wrap the return value in a
Task.
using System.Threading.Tasks;
...

public interface IDialer
{
    Task<bool> DialAsync(string number);
}
Add the IDialer implementations
There are pre-supplied concrete implementations of the IDialer interface for each platform provided in the Exercise 3 > Assets folder of your copy of the cloned or downloaded course materials.
Copy each one into the appropriate platform-specific project.
| Platform | File |
|---|---|
| iOS | PhoneDialer.iOS.cs |
| Android | PhoneDialer.Droid.cs |
| Universal Windows Platform | PhoneDialer.UWP.cs |
Register IDialer with the dependency service
-
Verify that your interface declaration matches the implementation in the provided files and that each of them implements the
IDialerinterface. -
In each dialer implementation source file, add an assembly-level
[assembly:Dependency]attribute to register the implementation. These can be placed into the same source file as the implementation of each dialer, but must be placed outside any namespace declaration. You may have to add ausingstatement for the app's namespace to be able to identify the types.
...
using Phoneword.iOS;

// This same attribute definition needs to go in each platform-specific file
[assembly: Dependency(typeof(PhoneDialer))]

namespace Phoneword.iOS
{
    public class PhoneDialer : IDialer
    {
        ...
    }
}
Add permissions to the Android project
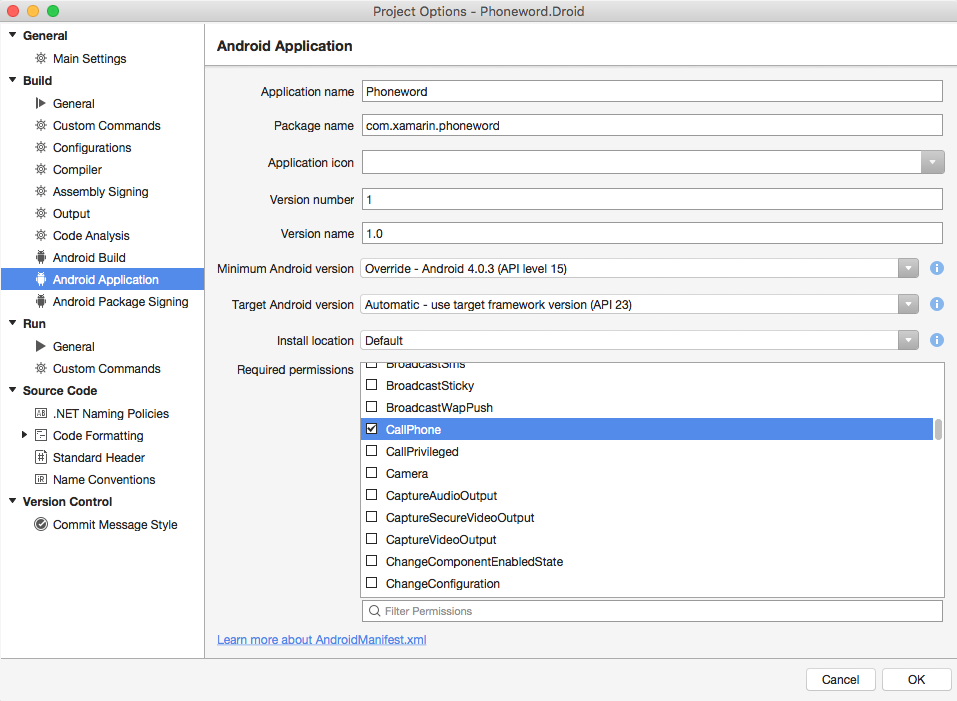
- Open the Project Options for the Android project.
- Click on Build > Android Application.
- In the Required permissions section, check the box next to the
CallPhonepermission (see below). - If the other fields are not filled out (depending on your environment, the template might leave them blank), then supply valid values using the below screen shot as an example.
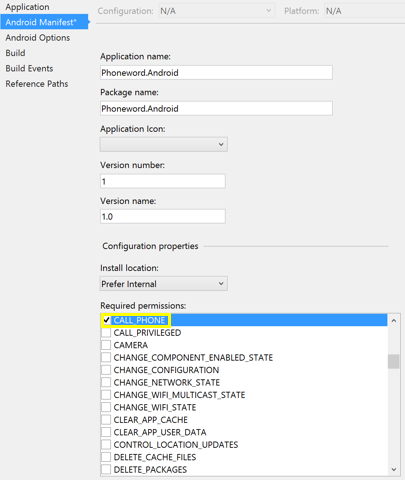
- Open the Properties for the Android project.
- Click on Android Manifest.
- In the Required permissions section, check the box next to the
CALL_PHONEpermission (see below).
Add permission helper NuGet package
On modern Android versions, permission to make a call must be requested at runtime. To simplify this process, we will be using James Montemagno's Permissions Plugin NuGet package to abstract away as much of the Android-only implementation details as we can.
Add a NuGet reference to the Plugin.Permissions package to each platform-specific projects and the shared .NET Standard project.
- Right-click on the Phoneword solution in Solution Explorer and choose Manage NuGet Packages for Solution....
- Switch to the Browse tab and search for "Plugin.Permissions".
- Check all the projects on the right-hand list to install the plugin everywhere in our solution.
- Right-click on the shared Phoneword project in the Solution pad and choose Add > Add NuGet Packages....
- From the search bar, find the "Plugin.Permissions" package.
- Select the Plugin.Permissions package and click Add Package.
- Repeat the above steps to install the permissions plugin on the Phoneword.Droid and Phoneword.iOS projects as well.
With the permissions NuGet package in place, we need to connect a few pieces together in the Android project.
The permissions package uses another NuGet package to get the current Android activity at any given time. To make sure it knows the current activity, we must initialize it in our MainActivity class.
- Within the Android project, open the MainActivity.cs file.
- Add the following line to the OnCreate method.
using Plugin.CurrentActivity;
...
protected override void OnCreate(Bundle bundle) {
    ...
    base.OnCreate(bundle);

    CrossCurrentActivity.Current.Init(this, bundle);
    ...
}
This code will connect the current activity plugin to the appropriate lifecycle events in Android to always be aware of the current activity.
To enable the permission system in Android, one last piece of code is required in our Android app's Xamarin.Forms activity.
- Within the Android project, open the MainActivity.cs file.
- Add the following OnRequestPermissionsResult method to your MainActivity class.
using Plugin.Permissions;
...
public override void OnRequestPermissionsResult(int requestCode, string[] permissions, [GeneratedEnum] Android.Content.PM.Permission[] grantResults)
{
    PermissionsImplementation.Current.OnRequestPermissionsResult(requestCode, permissions, grantResults);
    base.OnRequestPermissionsResult(requestCode, permissions, grantResults);
}
When Android presents a permission request to the user at runtime, this method is the callback the system uses to handle the user's response. Instead of handling the request here directly, though, we pass on any user response details to the permissions plugin.
Add permissions to the UWP project
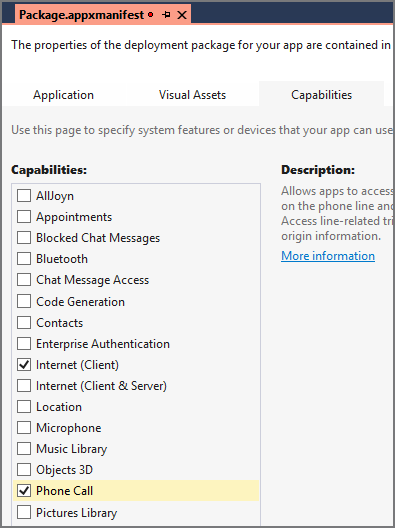
If you are testing the UWP application, then you will need to use the following steps.
- Open the Package.appxmanifest file in the UWP project.
- Click on the Capabilities tab.
- Check the box next to Phone Call to allow you to use the dialer without UI intervention. You can actually use the feature without this capability, this simply lets you do it without a UI prompt.
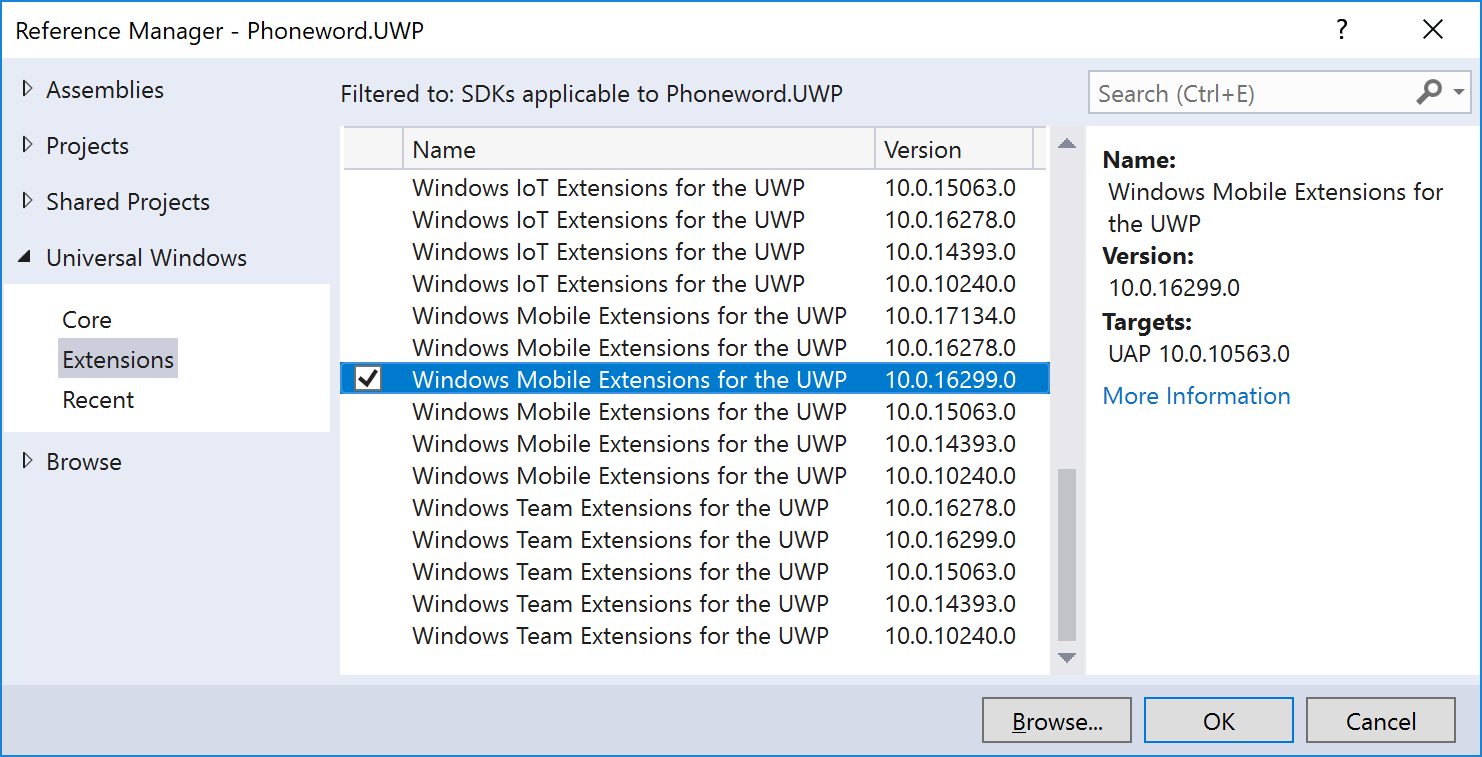
Add a reference to the UWP Mobile Extensions library
To use the PhoneCallManager APIs on UWP, we need to add a reference to an extension.
- Right-click your UWP project's References and choose Add Reference….
- Select the Universal Windows > Extensions section from the left navigation and check the Windows Mobile Extensions for the UWP reference.
- Click OK to add the reference.
Use the IDialer abstraction
Finally, let's invoke our phone dialer logic from the Call Button.
-
If the user responds affirmatively, then lookup the phone dialer using the
DependencyService. The service provides astaticmethod namedGet<T>that will locate and then provide access to a platform-specific implementation of an interface. In our case, we already registered our platform-specific implementation in a previous step using theDependencyAttribute. Here we will need to use theGet<T>method to retrieve the implementation of theIDialerinterface for our current platform. -
Use the retrieved concrete implementation of
IDialerto dial the phone using theDialAsyncmethod.
async void OnCall(object sender, System.EventArgs e)
{
    if (await this.DisplayAlert(
        "Dial a Number",
        "Would you like to call " + translatedNumber + "?",
        "Yes",
        "No"))
    {
        var dialer = DependencyService.Get<IDialer>();
        if (dialer != null)
            await dialer.DialAsync(translatedNumber);
    }
}
Run the application
- Run the application using a platform of your choice. Be sure to try both the translate and dial buttons.
- If you have time, run the app on each supported platform and try stepping through the program to see it jump into the platform-specific code. For some extra fun, try running this on a real device!
Many emulators and simulators will not properly simulate dialing the phone - however the Android SDK Virtual Devices are an exception. On other simulated platforms, your code may throw an exception when trying to dial the phone. If this happens, you can comment out the code to dial the phone, or wrap it in atry/catchstatement.
Exercise summary
In this final exercise, you have added support for dialing the phone using platform-specific APIs available in iOS, Android, and Windows.
You can view the completed solution in the Exercise 3 > Completed folder of your copy of the cloned or downloaded course materials.