Exercise 1: Share code using a Shared Project
The goal of this exercise is to load data from a JSON file and display it in an existing Xamarin application. The code to manage loading the file will be shared between the platform-specific projects using a Shared Project.
To complete the exercise, you will need Visual Studio for Windows or macOS with the Xamarin development tools installed. You will also need either an emulator/simulator or a device to run the exercise on. Please see the setup page if you need help installing the Xamarin development environment.
Open the starter solution
In your copy of the cloned or downloaded course exercise materials, find the Exercise 1 > Start folder. We will be using the MyTunes starter solution and the additional assets found there.
- Open the MyTunes.sln solution and build it to make sure you are ready to begin.
NOTE: Make sure you have selected a startup project and platform your individual development environment supports.
Add the Shared Project
As a first step, let's add a new Shared Project into the solution.
- Right click on the Solution node and select Add > Add a New Project.
-
Select Shared Project - it can be found in the Multiplatform > Library category. Click Next to continue.

-
Name the project "MyTunes.Shared" and click Create to create the project.

- You can delete the template C# file added to the project if there is one. We will replace it with some pre-written files.
- Right click on the solution name in the Solution Explorer and select Add -> New project....
-
Select Shared Project - it can be found under the Visual C# category, or you can use the Search Box at the top of the dialog to quickly locate the template.

- Name the project "MyTunes.Shared"
- Click OK to create the project.
Add provided code to the Shared Project
In the Exercise 1 > Assets folder of your copy of the cloned or downloaded course materials there are two source files you need to add to your shared project:
| File | Description |
|---|---|
| Song.cs | this defines a class which provides information about a single song. |
| SongLoader.cs | this is a class which can parse a JSON file off disk into a set of Song objects. It utilizes the Newtonsoft Json.NET parser. |
- Add both C# files to your shared project - right-click on the project node in the Solution pad and select Add > Add Files...; you can either add the files into the root of the project, or create a folder in the project to store them in.
- Look at both source files to get a sense of the content you will be working with.
- Add both C# files to your shared project - right-click on the project node in the Solution Explorer and select Add > Existing Item...; you can either add the files into the root of the project, or create a folder in the project to store them in.
- Look at both source files to get a sense of the content you will be working with.
Add a reference to the Shared Project
Next, we'll reference the shared project from each of the platform-specific projects.
- Right-click on each platform specific project and open the Add > References... dialog (or right-click the desired projects References node and select Add Reference...).
- Select the Shared Projects section, and then select the shared project you created earlier.

- Do this for each of the platform-specific projects you want to work with (iOS | Android | Windows).
- Right-click on the References folder in each platform-specific project and select Edit References....
- In the references dialog, select the Projects tab and then select the MyTunes.Shared project in the list.

- Do these steps for each of the projects you want to work with (iOS | Android).
If you try building the projects now you'll get a compilation error. We'll need to add a reference to Newtonsoft Json.NET (which we'll do in the step).
Add the Json.NET NuGet package
- Open the NuGet dialog by right-clicking on the Packages folder in each of the platform-specific projects you want to work with and selecting Add Packages....
- Search online and find the Newtonsoft.Json component - it should be one of the first packages displayed (due to its popularity).

- Open the NuGet Package Manager - right-click on the References folder of a platform head project and select Manage NuGet Packages....

- In the Browse tab, search for Newtonsoft.Json - it should be one of the first results (due to its popularity).
To add this NuGet package via the Package Manager Console, found in the menu under Tools > NuGet Package Manager > Package Manager Console, run the following command:
Install-Package Newtonsoft.Json
This will install the package in all compatible projects in your solution.
- Add the package to each of your supported platforms - the package must be added into the platform-specific projects, notice it's not possible to add a NuGet package to the shared project.
- You should now be able to compile each platform-specific project.
Use the song loader from the Shared Project
Now, let's add some code into each project to use load data using the SongLoader class. Follow the steps below for each platform you will be using:
- Locate the
ViewDidLoadmethod in the MyTunesViewController.cs. - Comment out the existing
TableView.Sourceassignment. - Load the data using
SongLoader.Load. This method uses the Task based Async pattern; you will need to await the call and decorateViewDidLoadwith theasynckeyword. - Call
ToListon theIEnumerable<Song>returned fromSongLoader.Load- we'll use this in the next step. (This will require theSystem.Linqnamespace.) - Create a new
ViewControllerSource<Song>and assign the following properties: DataSourceto the Listfrom the previous step. TextProcto a lambda that returns the name of a song:s => s.Name.DetailTextProcto a lambda that returns the artist and album:s => s.Artist + " - " + s.Album.- Assign the
ViewControllerSourcetoTableView.Source.
using System.Linq;
...
public async override void ViewDidLoad()
{
    base.ViewDidLoad();

    //TableView.Source = new ViewControllerSource<string>(TableView) {
    //    DataSource = new string[] { "One", "Two", "Three" },
    //};

    // Load the data
    var data = await SongLoader.Load();

    // Register the TableView's data source
    TableView.Source = new ViewControllerSource<Song>(TableView)
    {
        DataSource = data.ToList(),
        TextProc = s => s.Name,
        DetailTextProc = s => s.Artist + " - " + s.Album,
    };
}
- Locate the
OnCreatemethod in MainActivity.cs. - Comment out the existing
ListAdapterassignment. - Load the data using
SongLoader.Load. This method uses the Task based Async pattern; you will need to await the call and decorateOnCreatewith theasynckeyword. - Call
ToListon theIEnumerable<Song>returned fromSongLoader.Load- we'll use this in the next step. (This will require theSystem.Linqnamespace.) - Create a new
ListAdapter<Song>and assign the following properties: - Set the
DataSourceproperty to your new list. - Set the
TextProcto a lambda that returns the song name:s => s.Name. - Set the
DetailTextProcto a lambda that returns the artist and album:s => s.Artist + " - " + s.Album. - Assign the object to the
ListAdapterproperty.
using System.Linq;
...
protected async override void OnCreate(Bundle bundle)
{
    base.OnCreate(bundle);

    //ListAdapter = new ListAdapter<string>() {
    //    DataSource = new[] { "One", "Two", "Three" }
    //};

    var data = await SongLoader.Load();

    ListAdapter = new ListAdapter<Song>()
    {
        DataSource = data.ToList(),
        TextProc = s => s.Name,
        DetailTextProc = s => s.Artist + " - " + s.Album
    };
}
- Locate the
OnNavigatedTomethod in the MainPage.xaml.cs. - Comment out the existing
this.DataContextassignment andtempDatavariable. - Load the data using
SongLoader.Load. This method uses the Task based Async pattern; you will need to await the call and decorateOnNavigatedTowith theasynckeyword. - Call
ToListon theIEnumerable<Song>returned fromSongLoader.Load- we'll use this in the next step. (This will require theSystem.Linqnamespace.) - Assign the resulting list to the
DataContextproperty.
There is already a DataTemplate setup to display the song data.
protected override async void OnNavigatedTo(NavigationEventArgs e)
{
    //var tempData = Enumerable.Range(1, 3).Select(i =>
    //{
    //    return new
    //    {
    //        Name = "Song" + i,
    //        Artist = "Artist" + i,
    //        Album = "Album" + i
    //    };
    //}).ToList();

    // this.DataContext = tempData;

    var data = await SongLoader.Load();

    DataContext = data.ToList();
}
Make sure each project compiles. It will fail at runtime because we haven't provided the data yet - let's do that next.
Add the songs.json data file
Next you will add the songs.json file into each platform-specific project from the Exercise 1 > Assets folder of your copy of the cloned or downloaded course materials
- iOS - Add the songs.json file into the Resources folder and make sure the build action is marked as BundleResource
- Android - Add the songs.json file into the Assets folder and make sure the build action is marked as AndroidAsset.
- UWP - Add the songs.json file into the root of the Windows project and set the build action to Content.
Make sure all your projects still build successfully. The platform projects will throw an ArgumentNullException at runtime if run, though, until we read our new data.
Add code to read the data file
Now that the data file has been added to each platform-specific project, we need to use platform-specific code to load our data. We can use any of the three approaches outlined in the course (conditional compilation, cloning and partial classes), and you should experiment and try each one in turn; however for the sake of time, we will use conditional compilation in these instructions.
All our work will be done in the SongLoader class in the shared project, specifically we'll be working in the existing OpenData method which will open the file and return it as a System.IO.Stream.
Keep in mind; with conditional compilation, the definition of the OpenData method may change as you add support for additional platforms. For example, adding support for the Windows.Storage APIs in Windows will cause the method to change and support a Task based return type.
You still want to use a single OpenData method and as a result you may have to refactor the code consuming this method.
Follow the instructions below for the target platforms you want to support.
- In the
OpenDatamethod, add a compiler directive for iOS; The Xamarin.iOS compiler defines__IOS__for this purpose. (If you are doing multiple platforms, use can useeliffor "else if" on subsequent conditional blocks.) - In your conditional code block, use the
System.IO.File.OpenReadmethod to open the file using theconst stringFileName. - Make sure the iOS project builds.
private static Stream OpenData()
{
#if __IOS__
    return File.OpenRead(Filename);
#else
   // TODO: add code to open file here.
    return null;
#endif
}
- Add a conditional marker for the Android code; Xamarin.Android defines the
__ANDROID__symbol for this. (If you are doing multiple platforms, use can useeliffor "else if" on subsequent conditional blocks.) - In your conditional code block, use the
Android.App.Application.Context.Assets.Openmethod to open the filename. - Make sure the Android project builds.
private static Stream OpenData()
{
#if __ANDROID__
    return Android.App.Application.Context.Assets.Open(Filename);
#else
   // TODO: add code to open file here.
    return null;
#endif
}
- Add a conditional marker for Windows; Microsoft defines
WINDOWS_UWP. (If you are doing multiple platforms, use can useeliffor "else if" on subsequent conditional blocks.) - In your conditional code blocks, use the
Windows.ApplicationModel.Package.Current.InstalledLocation.GetFileAsyncmethod to open the filename. This returns aStorageFile. - Call
OpenStreamForReadAsyncon theStorageFileto retrieve a Stream. - Because UWP APIs are frequently
async, you will need to change the method signature to beasyncand use theawaitkeyword - the calling code will also need to be adjusted for this. - The code for the other platforms can remain the same - however you will get a compiler warning because the method is decorated with
asyncbut doesn't contain any awaited calls for iOS and Android. You can ignore these warnings. - Make sure the Windows project builds.
public static async Task<IEnumerable<Song>> Load()
{
    using (var reader = new StreamReader(await OpenData())) {
        return JsonConvert.DeserializeObject<List<Song>>(
                await reader.ReadToEndAsync());
    }
}

private async static Task<Stream> OpenData()
{
#if WINDOWS_UWP
   var sf = await Windows.ApplicationModel.Package.Current.InstalledLocation.GetFileAsync(Filename);
   return await sf.OpenStreamForReadAsync();
#else
   // TODO: add code to open file here.
   return null;
#endif
}
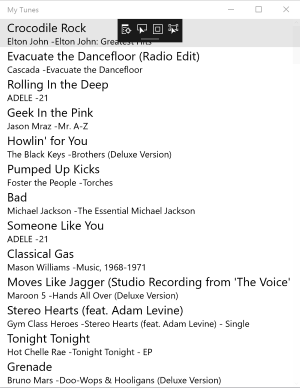
Run the application
Run the application on each platform - they should all display the song list.


Exercise summary
Congratulations!In this exercise, we created a Shared Project and referenced it from iOS, Android, and Windows UWP projects. The Shared Project contained both platform-agnostic code, as well as platform-specific code isolated using compiler directives for each platform.
You can view the completed solution in the Exercise 1 > Completed folder of your copy of the cloned or downloaded course materials.