Exercise 3: Create the UI for a Tip Calculator
In this exercise, we will be adding three controls to our screen: a UITextField, a UIButton and a UILabel to complete the UI for a simple Tip Calculator.
To complete the exercise, you will need Visual Studio for Windows or macOS with the Xamarin development tools installed. You will also need either an emulator/simulator or a device to run the exercise on. Please see the setup page if you need help installing the Xamarin development environment.
Open the starter solution
This exercise is a continuation of the previous exercise. You can use your existing solution or begin from the prior Exercise 2 > Completed solution in your copy of the cloned or downloaded course materials.
Override ViewDidLoad
In this section, we will add the controls to our UI to create the GUI for the Tip Calculator. You can use Visual Studio on macOS or Windows - the instructions are identical for both.
- Open the MyViewController.cs source file.
- Override the
ViewDidLoadmethod. - Call the base implementation.
public override void ViewDidLoad()
{
    base.ViewDidLoad();
}
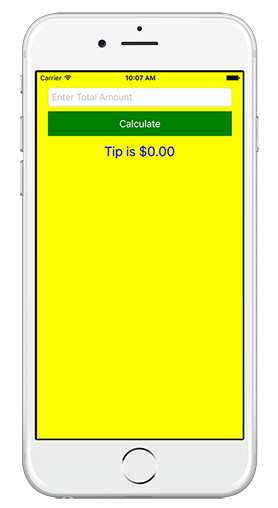
Set the background color
- Set the
BackgroundColorproperty for the View to Yellow. You can use theUIColor.Yellowconstant as your color value or specify an RGB value.
public override void ViewDidLoad()
{
    base.ViewDidLoad();
    this.View.BackgroundColor = UIColor.Yellow;
}
Create a text field
- Locate the
ViewDidLoadmethod. - Create a
UITextFieldvariable named totalAmount. -
Set the text field's Frame property.
Calculate the frame using the diagram below - it should be 20pts from the left and right edges of the screen, 28pts from the top and be 35pts high (the width is based on the screen). You will need to use the
View.Bounds.Widthto stretch this across the view. You can either pass the calculatedCGRectinto the constructor, or set theFrameproperty.Note:
CGRectis found in theCoreGraphicsnamespace.

using CoreGraphics;

public override void ViewDidLoad()
{
    base.ViewDidLoad();
    …
    var totalAmount = new UITextField() {
        Frame = new CGRect(20, 28, View.Bounds.Width - 40, 35),
    };
}
Set the text field properties
When instantiating the UITextField assign the following properties:
- Set the
KeyboardTypeproperty toUIKeyboardType.DecimalPad. - Set the
BorderStyleproperty toUITextBorderStyle.RoundedRect. - Set the
Placeholderproperty to"Enter Total Amount".
public override void ViewDidLoad()
{
    base.ViewDidLoad();
    …
    var totalAmount = new UITextField()
    {
        Frame = new CGRect(20, 28, View.Bounds.Width - 40, 35),
        KeyboardType = UIKeyboardType.DecimalPad,
        BorderStyle  = UITextBorderStyle.RoundedRect,
        Placeholder  = "Enter Total Amount",
    };
}
Create a button
-
Next, create a new
UIButtonvariable in theViewDidLoadoverride:- Name the button
calcButton. - Pass
UIButtonType.Customto the constructor so we can change the colors. - Calculate the frame using the diagram below, like the text field, it should be 20pts from the left and right edges of the screen and should be 8pts below the text field. From the above diagram, it should be 45pts in height. You will need to set the
Frameproperty directly in order to use the constructor that takes a button type.
- Name the button
public override void ViewDidLoad()
{
    base.ViewDidLoad();
    …
    var calcButton = new UIButton(UIButtonType.Custom)
    {
        Frame = new CGRect(20, 71, View.Bounds.Width - 40, 45),
    };
}
Set the button properties
- Set the
BackgroundColorto a dark green using theUIColor.FromRGBstatic method (make the green component 0.5f to make it darker) - Use the
SetTitlemethod to set the text to"Calculate"for the normal control state (UIControlState.Normal).
public override void ViewDidLoad()
{
    base.ViewDidLoad();
    …
    var calcButton = new UIButton(UIButtonType.Custom) {
       Frame = new CGRect(20, 71, View.Bounds.Width - 40, 45),
       BackgroundColor = UIColor.FromRGB(0, 0.5f, 0),
    };
    calcButton.SetTitle("Calculate", UIControlState.Normal);
}
Create a UILabel
-
Create a new
UILabelvariable in theViewDidLoadmethod:- Name the label
resultLabel. - Calculate the frame using the diagram below, it should be 40pts high and have the same left and right margins as the other two controls. You can pass the frame into the constructor, or set the property.
- Name the label
public override void ViewDidLoad()
{
    base.ViewDidLoad();
    …
    var resultLabel = new UILabel()
    {
        Frame = new CGRect(20, 124, View.Bounds.Width - 40, 40),
    };
}
Set the label properties
Set the following property values on the label:
| Property | Value |
|---|---|
| TextColor | UIColor.Blue |
| TextAlignment | to UITextAlignment.Center to center the text horizontally |
| Font | to UIFont.SystemFontOfSize(24) to increase the font size |
| Text | to "Tip is $0.00" to assign default text |
public override void ViewDidLoad()
{
    base.ViewDidLoad();
    …
    var resultLabel = new UILabel() {
        Frame = new CGRect(20, 124, View.Bounds.Width - 40, 40),
        TextColor = UIColor.Blue,
        TextAlignment = UITextAlignment.Center,
        Font = UIFont.SystemFontOfSize(24),
        Text = "Tip is $0.00",
    };
}
Display the child views
Now we need to add all the child views into our screen. You can add them individually (View.Add or View.AddSubview), or add them as an array of UIView objects using View.AddSubviews.
public override void ViewDidLoad()
{
    base.ViewDidLoad();
    …
    var totalAmount = …;
    var calcButton = …;
    var resultLabel = …;
    View.AddSubviews(totalAmount, calcButton, resultLabel);
}
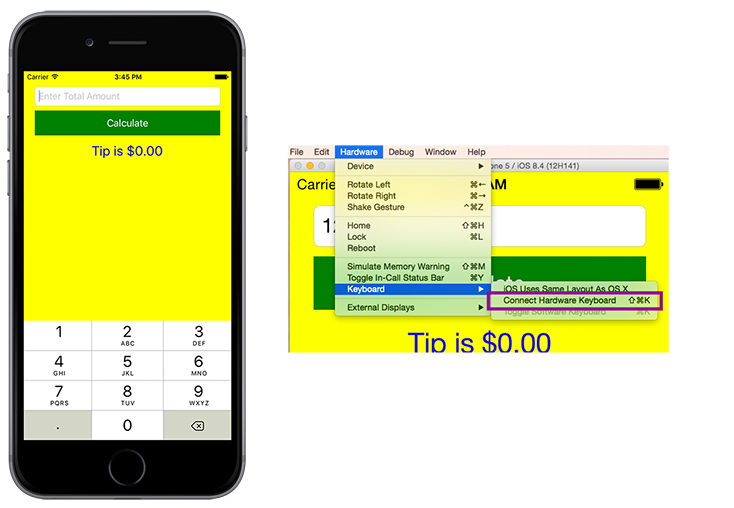
Build the application
-
Build and run the application. You should see an interactive UI, it won't have any behavior yet, but you should be able to tap in the edit field and enter values with the on-screen keyboard.
- If you don't see the on-screen keyboard when you tap, but you see a cursor, then it's likely that the simulator is configured to use the hardware keyboard on your Mac. You can change this using the Hardware > Keyboard > Connect Hardware Keyboard option on the simulator menu.
Notice that the on-screen keyboard appears automatically when you tap in the edit field, but does not dismiss when you tap the button? We'll talk about this behavior next.
Exercise summary
Congratulations! In this exercise, you have added several controls to your application. The final step will be to add behavior to the tip calculator.You can view the completed solution in the Exercise 3 > Completed folder of your copy of the cloned or downloaded course materials.
