Exercise 2: Add a root view controller to the Tip Calculator app
The primary goal of this lab is to disable the default Storyboard UI from the TipCalculator project you created in the previous exercise and replace it with a code-based UIViewController which will be set as the RootViewController for the application.
To complete the exercise, you will need Visual Studio for Windows or macOS with the Xamarin development tools installed. You will also need either an emulator/simulator or a device to run the exercise on. Please see the setup page if you need help installing the Xamarin development environment.
Open the starter solution
This exercise is a continuation of the previous exercise. You can use your existing solution or begin from the prior Exercise 1 > Completed solution in your copy of the cloned or downloaded course materials.
Remove boilerplate code
The Single View App template created both a Storyboard UI and a View Controller with some basic overrides that are linked to the UI. We want to start from scratch in this app so in this step, we will delete the existing View Controller code and replace it with a new C# class to act as our primary view controller.
- Open your TipCalculator solution.
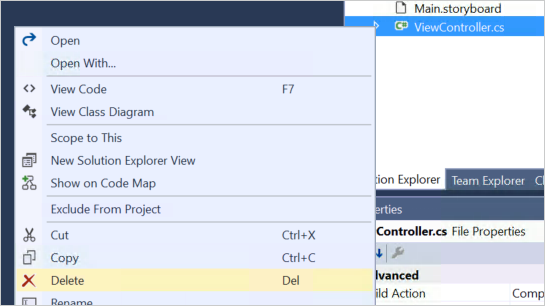
- Locate ViewController.cs.
- Right-click on it and select Delete.
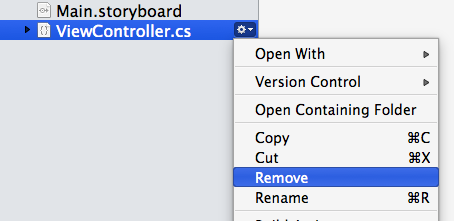
- Right-click on it (or select the gear icon next to it when it is highlighted) and select Remove. You can safely delete this file.
Add a new class
- Add a new file to the project using either Project ➤ Add Class from the menu, or use Add ➤ Class from the project context menu.
- Choose the Empty Class template from the Apple category and name the file MyViewController, and click "Add" to create the file and add it to your project.
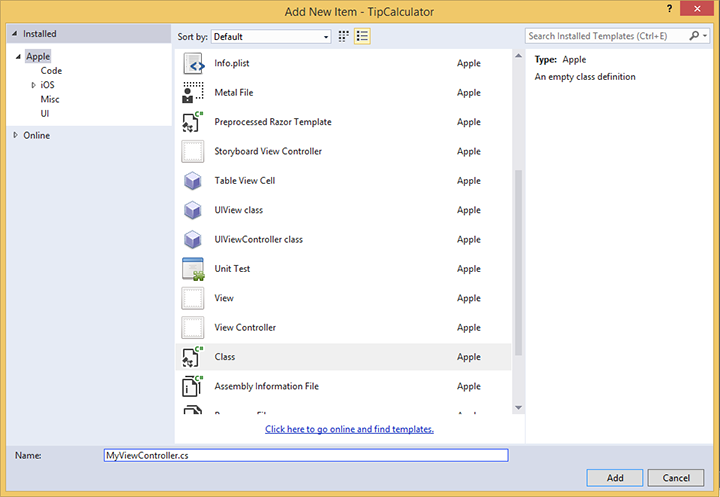
- Add a new file to the project using either File ➤ New ➤ File... from the menu, or use Add ➤ New File from the project context menu.
- Choose Empty Class from the General category and name the file MyViewController; Make sure that Add to project is selected and click New to create the file.

Derive from UIViewController
- Open the new source file (the IDE should open it automatically) and update the class to derive from
UIViewController. You will need to fully-qualify the class or add the UIKit namespace to your using statements at the top of the file.
using System;
using UIKit;

namespace TipCalculator
{
    public class MyViewController : UIViewController
    {
        public MyViewController()
        {
        }
    }
}
Assign a window
- Open AppDelegate.cs.
- Locate the
FinishedLaunchingmethod and remove all of the code and comments from within the method. - Create a new
UIWindowobject and assign it. The constructor forUIWindowtakes aCGRectwhich defines the rectangle that the window will cover. We want it to cover the entire device screen, so use the static propertyUIScreen.MainScreen.Boundsas the parameter; this defines the entire screen size. - Assign the created
UIWindowto the existingWindowproperty.
public override bool FinishedLaunching(UIApplication application, NSDictionary launchOptions)
{
    // create a new window instance based on the screen size
    Window = new UIWindow(UIScreen.MainScreen.Bounds);
}
Display a view controller
- Create a new instance of
MyViewControllerand assign it to theWindow.RootViewControllerproperty. This will display your View Controller (and the view it is responsible for) as the initial screen when the app starts.
public override bool FinishedLaunching(UIApplication application, NSDictionary launchOptions)
{
    // create a new window instance based on the screen size
    Window = new UIWindow(UIScreen.MainScreen.Bounds);

    // Assign the root view controller
    Window.RootViewController = new MyViewController();
}
Set the primary window
- We have to direct iOS to make this new window the primary or key window - to do this call the
MakeKeyAndVisiblemethod on theUIWindowobject. - Return
truefrom the method to finish the implementation.
public override bool FinishedLaunching(UIApplication application, NSDictionary launchOptions)
{
    // create a new window instance based on the screen size
    Window = new UIWindow(UIScreen.MainScreen.Bounds);

    // Assign the root view controller
    Window.RootViewController = new MyViewController();

    // make the window visible
    Window.MakeKeyAndVisible();

    return true;
}
Compile the application
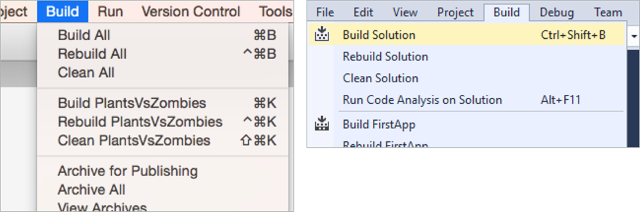
- Use the Build menu to compile the application and correct any compile errors.
Exercise summary
Congratulations! In this exercise you replaced the default view controller with a code-based UIViewController and set as the RootViewController for the application.
You can view the completed solution in the Exercise 2 > Completed folder of your copy of the cloned or downloaded course materials.