Exercise 3: Implement an Activity's behavior and run your app in an emulator
The goal of this exercise is to write C# code to access and manipulate the UI of an Activity. Your code will need to read/write the properties on several text controls and subscribe to an event on a button. To do this, you will need to assign IDs to some of the views in the XML and lookup the views by ID in the code.
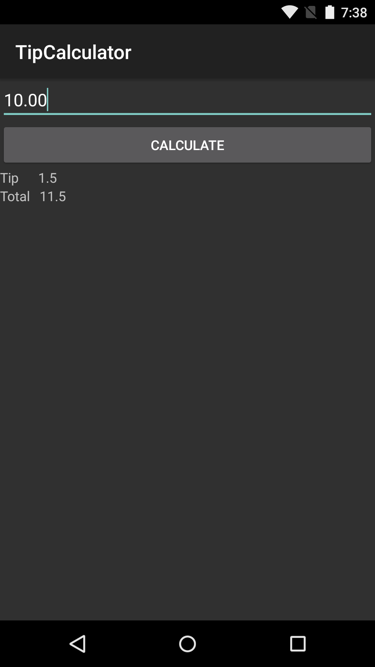
You will be continuing to work on the TipCalculator app. The picture below shows the UI. The two TextViews that display the words "Tip" and "Total" are static and you won't need to access them. All the other views will need to be accessed from code: the EditText so you can read the amount of the bill, the Button so you can subscribe to its Click event, and the other two TextViews so you can display the values you calculate for the tip and total.
To complete the exercise, you will need Visual Studio for Windows or macOS with the Xamarin development tools installed. You will also need either an emulator/simulator or a device to run the exercise on. Please see the setup page if you need help installing the Xamarin development environment.
Open the solution
This exercise is a continuation of the previous exercise. You can use your existing solution or begin from the prior Exercise 2 > Completed solution in your copy of the cloned or downloaded course materials.
Add IDs to your views
Here, you will add IDs to several of your UI views so you can access them from code.
- Open the file Resource > Layout > Main.axml in the Source view.
- Add an ID to the
EditText. The XML is shown below. The "@+id" characters indicate that you want to create a new ID value. The text after the forward slash is the value for the ID.
<EditText
  android:id="@+id/inputBill"
  ... />
- Add an ID of
calculateButtonto theButton. - Add an ID of
outputTipto the secondTextViewinside the first of the two horizontalLinearLayouts. - Add an ID of
outputTotalto the secondTextViewinside the second of the two horizontalLinearLayouts.
 <Button
    android:id="@+id/calculateButton"
    ... />

 <TextView
    android:id="@+id/outputTip"
    ... />

<TextView
    android:id="@+id/outputTotal"
    ... />
Look-up views in code
Next, use the IDs to lookup views in code. You will store the references in fields inside your Activity class.
- Open MainActivity.cs.
-
Add four fields to the
MainActivity class, one for each of the four views to which you added IDs (i.e. anEditText, aButton, and twoTextViews).
EditText inputBill;
Button calculateButton;
TextView outputTip;
TextView outputTotal;
- Inside
OnCreate, use theFindViewByIdmethod to lookup each of the four views and assign the returned references to the corresponding fields. Be sure to place your lookup code after the call toSetContentView; the views you are trying to access are created inSetContentViewso they don't exist until after that call completes.
protected override void OnCreate(Bundle bundle)
{
   base.OnCreate(bundle);
   SetContentView(Resource.Layout.Main);

   inputBill = FindViewById<EditText>(Resource.Id.inputBill);
   ...
}
Note: When typing this code by hand, make sure to use theResource(singular) namespace instead ofResources, or you won't be able to find theIdmembers for your app.
Subscribe to an event
Recall that we need to respond when the user taps the Calculate button - that will be our signal that the user has entered the amount of their bill and is ready for us to calculate the tip and total.
- Inside
OnCreate, subscribe a handler to the button'sClickevent. TheClickevent uses the standard .NET event pattern so the handler will have anobjectparameter and anEventArgsparameter.
using System;
...

protected override void OnCreate(Bundle bundle)
{
   ...
   calculateButton = FindViewById<Button>(Resource.Id.calculateButton);
   calculateButton.Click += OnCalculateClick;
}

void OnCalculateClick(object sender, EventArgs e)
{
  ...
}
Retrieve user input
-
In your handler for the
Button'sClickevent, retrieve theTextfrom theEditText. This will be the amount of the bill. Store it in a local variable of typestring. -
Convert the bill input from a
stringto adouble. Store the result in a local variable. You can include error checking if you would like to; however, the solution will omit it in order to keep the code focused on the key techniques.
void OnCalculateClick(object sender, EventArgs e)
{
   string text = inputBill.Text;
   var bill = double.Parse(text);
   ...
}
Compute the results
Continue working in the Click event handler for the Calculate button.
- Compute a 15% tip for the bill and store it in a local variable.
- Compute the total payment (original bill + tip) and store it in a local variable.
void OnCalculateClick(object sender, EventArgs e)
{
   string text = inputBill.Text;
   var bill = double.Parse(text);

   var tip = bill * 0.15;
   var total = bill + tip;
   ...
}
Display the results
-
Load the tip amount into the
Textproperty of theTextViewintended to display the tip. Your tip amount should be in a variable of typedoubleso you can use itsToStringmethod to convert it into a string so you can assign it to theTextproperty of theTextView. -
Load the total payment into the
Textproperty of theTextViewintended to display the total.
void OnCalculateClick(object sender, EventArgs e)
{
    string text = inputBill.Text;
    var bill = double.Parse(text);
    var tip = bill * 0.15;
    var total = bill + tip;

    outputTip.Text = tip.ToString();
    outputTotal.Text = total.ToString();
}
Adjust the margin
Currently, the text labels "Tip" and "Total" do not have any space between them and the result values to their right. You can adjust this by including a layout margin setting on these TextViews. Margin adds space around the outside of a view. There are several options for margin - we will only use the variant that adds space to the right side.
- Add the attribute setting shown below to the
TextViewdisplaying the text "Tip".
android:layout_marginRight="20dp"
- Repeat the previous step for the
TextViewdisplaying the text "Total".
Run the app
- Run the app to test your work. The image below shows an example of the expected output.

Exercise summary
In this exercise, you implemented the behavior for an Activity. The key technique was assigning IDs to your views in XML and then using the IDs to lookup the views from code. This lets you write code that manipulates your Activity's UI.
You can view the completed solution in the Exercise 3 > Completed folder of your copy of the cloned or downloaded course materials.