Exercise 2: Add views to a layout file manually and with the Designer tool
This exercise has two goals: you will build part of your UI manually in XML and part of it using the Xamarin Android Designer. Both are useful skills. Understanding the raw XML can help you arrange your UI in exactly the way you want. Knowing how to use the Designer tool helps you build a UI more quickly than coding XML by hand.
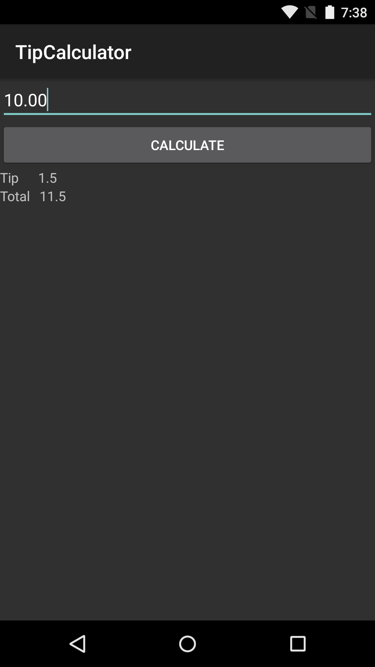
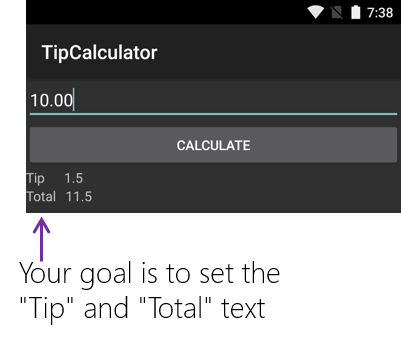
You will be working on an app to compute the tip for a restaurant bill. The user will enter the amount of the bill and touch the Calculate button. The app will retrieve the bill amount from the UI, calculate the tip and total, and display those two values in the UI. This exercise only covers creating the UI; the code for the calculations will be done in a subsequent exercise.
The picture below shows the completed app with the UI you will be building in this exercise.
To complete the exercise, you will need Visual Studio for Windows or macOS with the Xamarin development tools installed. You will also need either an emulator/simulator or a device to run the exercise on. Please see the setup page if you need help installing the Xamarin development environment.
Open the solution
This exercise is a continuation of the previous exercise. You can use your existing solution or begin from the prior Exercise 1 > Completed solution in your copy of the cloned or downloaded course materials.
Remove the template code
Some of the templates for Xamarin.Android display and interact with a button. We won't be using the default code. If the code is present, remove it by following the steps below.
- Open MainActivity.cs.
- Remove the count field and the code to locate the button and subscribe to the click event. When you are finished, the
MainActivityclass should match the code below.
[Activity(Label = "TipCalculator", MainLauncher = true, Icon = "@mipmap/icon")]
public class MainActivity : Activity
{
   protected override void OnCreate(Bundle bundle)
   {
      base.OnCreate(bundle);
      SetContentView(Resource.Layout.Main);
   }
}
Remove the template button XML
Remove the Button from the layout for the Main Activity if it exists in your solution.
- Open the Resource > Layout > Main.axml file.
- Switch to the Source view: Opening Main.axml will likely open the Android designer, click on the Source tab to switch to the source view.
- Delete the
Buttonthat was added by the starter template.
<Button
    android:id="@+id/myButton"
    android:layout_width="match_parent"
    android:layout_height="wrap_content"
    android:text="@string/hello" />
Set layout orientation
LinearLayout defaults to horizontal orientation and we need it to be vertical. The template will likely have set up LinearLayout correctly; however, it is worth taking a moment to check to be sure.
- Open the file Resource > Layout > Main.axml in the Source view.
- Verify that the root XML element is a
LinearLayoutand that its orientation is vertical. Make sure it usesmatch_parentfor both the width and height (Note:fill_parentdoes the same thing but it is deprecated somatch_parentis preferred). The XML is shown below.
<?xml version="1.0" encoding="utf-8"?>
<LinearLayout
  xmlns:android="http://schemas.android.com/apk/res/android"
  android:orientation="vertical"
  android:layout_width="match_parent"
  android:layout_height="match_parent">
  ...
</LinearLayout>
Add an EditText
Recall that we are creating a TipCalculator. We'll start our UI by adding an input text field to allow the user to enter the bill amount.
- Add an
EditTextinside theLinearLayout - Set its
android:layout_widthattribute tomatch_parent. - Set its
android:layout_heightattribute towrap_content.
<EditText
  android:layout_width="match_parent"
  android:layout_height="wrap_content" />
Add a button
Next, we'll add a Button to perform the tip calculation.
- Add a
Buttoninside theLinearLayoutand below theEditText. - Set its
android:layout_widthattribute tomatch_parent. - Set its
android:layout_heightattribute towrap_content. - Set its
android:textattribute to CALCULATE.
<Button
  android:layout_width="match_parent"
  android:layout_height="wrap_content"
  android:text="CALCULATE" />
Open the Designer
Xamarin.Android includes a UI Designer that is integrated into Visual Studio. The goal of the next few steps is to use the Designer to build the lower part of the UI shown below. Specifically, you will add the four TextViews and the two LinearLayout objects that manage the text.

Open the Designer:
- Right-click on the Resource > Layout > Main.axml file
- Choose Open With
- Select Layout Editor
- Right-click on the Resource > Layout > Main.axml file
- Choose Open With...
- Select Android Layout file
- Click OK
To learn more about the Designer, see Designer Basics.
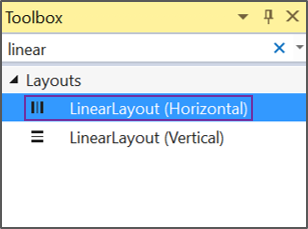
Add LinearLayouts
Here you add the two LinearLayouts that will manage the four TextViews that display the tip and total.
-
Drag a
LinearLayout(Horizontal) from the Layouts section of the Toolbox and drop it at the bottom of the existing views in your UI (i.e. below the button). This will add aLinearLayoutto the root layout. -
Repeat the above step to add a second
LinearLayout(Horizontal) below the first one.
Add TextViews
Here, you will add four TextView controls to display the tip and total amounts. Two TextViews will go inside each of the horizontal LinearLayouts you added in the previous step. Two of the TextViews will display static text and two will have their text set dynamically from code.
The Toolbox with the correct view highlighted is shown below.
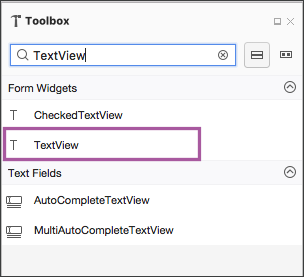
- Drag a
TextViewfrom the the Form Widgets section of the Toolbox and drop it on the first horizontalLinearLayout. - Repeat the previous step.
- Drag a
TextViewfrom the Toolbox and drop it on the second horizontalLinearLayout. - Repeat the previous step.
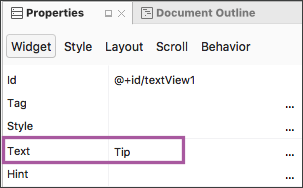
Edit properties
The goal here is to use the Designer's Properties window to set the text in two of the TextViews (see below).
- Select the leftmost
TextViewin the top horizontalLinearLayout. - In the Properties window, locate the Text property and set it to Tip.
- Repeat the previous two steps to set the text of the lower-left
TextViewto Total.
An example of the Properties window with the correct property highlighted and the value filled in is shown below.
Check your AXML UI
- Switch to the Source view and check your work. Verify that the structure you built matches the XML shown below.
<LinearLayout ... >

    <EditText
        android:layout_width ="match_parent"
        android:layout_height="wrap_content" />

    <Button
        android:layout_width ="match_parent"
        android:layout_height="wrap_content"
        android:text ="CALCULATE" />

    <LinearLayout
        android:layout_width ="match_parent"
        android:layout_height="wrap_content">
        <TextView
            android:text ="Tip"
            android:layout_width ="wrap_content"
            android:layout_height="wrap_content" />
        <TextView
            android:layout_width ="match_parent"
            android:layout_height="wrap_content" />
    </LinearLayout>

    <LinearLayout
        android:layout_width ="match_parent"
        android:layout_height="wrap_content">
        <TextView
            android:text ="Total"
            android:layout_width ="wrap_content"
            android:layout_height="match_parent" />
        <TextView
            android:layout_width ="wrap_content"
            android:layout_height="match_parent" />
    </LinearLayout>

</LinearLayout>
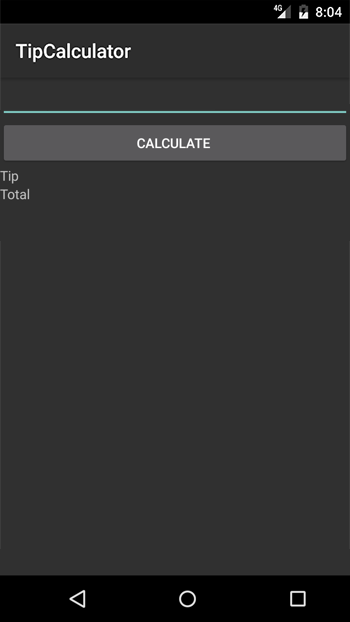
Run the app
Run the Tip Calculator app, you should see the UI you just defined. It won't have any behavior yet; however, running it at this point will allow you to check for syntax errors and ensure that the UI looks reasonable on the emulator.
Exercise summary
In this exercise, you built the UI of a Xamarin.Android application using both hand-coded XML and the Xamarin Android Designer. Both skills are useful. In practice, it's likely you will flip back-and-forth between them as you create your UI.
You can view the completed solution in the Exercise 2 > Completed folder of your copy of the cloned or downloaded course materials.